How to Set Up Your First Call Tracking Campaign
Welcome to Retreaver!
Retreaver utilizes call tracking in order to track or monitor events that occurred before, during or after a call.
Retreaver users track Publishers (sources) who generate call traffic from Adwords, Facebook or their website and send those calls to call center Buyers (contact handlers) such as a sales agent or customer support line.
Warning
Retreaver terminology
Retreaver documentation may use different terms for the same topic, which is a legacy feature allowing our users to choose between common Performance Marketing vs traditional call tracking terminology:
Publisher = Source (aka Affiliate in our API)
Buyer = Call Handler (aka Target in our API)
Retreaver has a toggle called “Performance Marketing Edition” in the Retreaver Store which allows you to switch between Buyer vs Handler and Publisher vs Source.
This guide uses Publisher and Buyer for simplicity and we are slowly migrating to only using this phrasing everywhere.
Components of a Retreaver Call Campaign

Call Publishers
Track Publishers that generate calls:
Each call tracking campaign begins with a publisher. Publishers are affiliate marketers who create mediums such as websites, web ads, landing pages, forms, call center transfers, and billboard ads to generate traffic. In the call tracking world, the traffic will be in the form of calls (though broadly speaking, they can be clicks, sign-ups, purchases, and other forms of traffic). An example of a publisher would be an insurance comparison website that directs inbound calls to individual insurance companies.

Call Buyers
Send calls to a Buyer:
Calls need a buyer to route to. Retreaver uses buyers to create and define a call destination; in other words, who the call will be going to. Buyers can represent a single agent, a call centre or a direct business line. Using the same example as before, the buyer in this instance would be the network who purchases the inbound calls from the publisher.

Call Tracking Campaign
Configure caller experiences using campaigns:
Once you have a publisher and call destination, you must then create a campaign to build the call experience you wish to deliver. Campaigns can contain features such as routing settings, IVR prompts, conversion criteria and webhook capabilities. Campaigns must also have numbers or number pools which will be used to drive calls into this campaign for processing. This will be the public-facing number (or pool of numbers) that leads will be dialing in to.
Creating a Call Tracking Campaign
Retreaver makes it possible to attribute multiple streams of traffic to their respective publishers and direct calls to the most appropriate buyer. This guide will walk you through the steps to create a basic call tracking campaign.
1. Creating Publishers
Create any publishers you wish to track. Click to add a publisher here.
Within your Retreaver account, click Publishers on the main sidebar (may be labeled Sources), then New publisher at the top of the page (may be labeled New source).
Publisher Properties
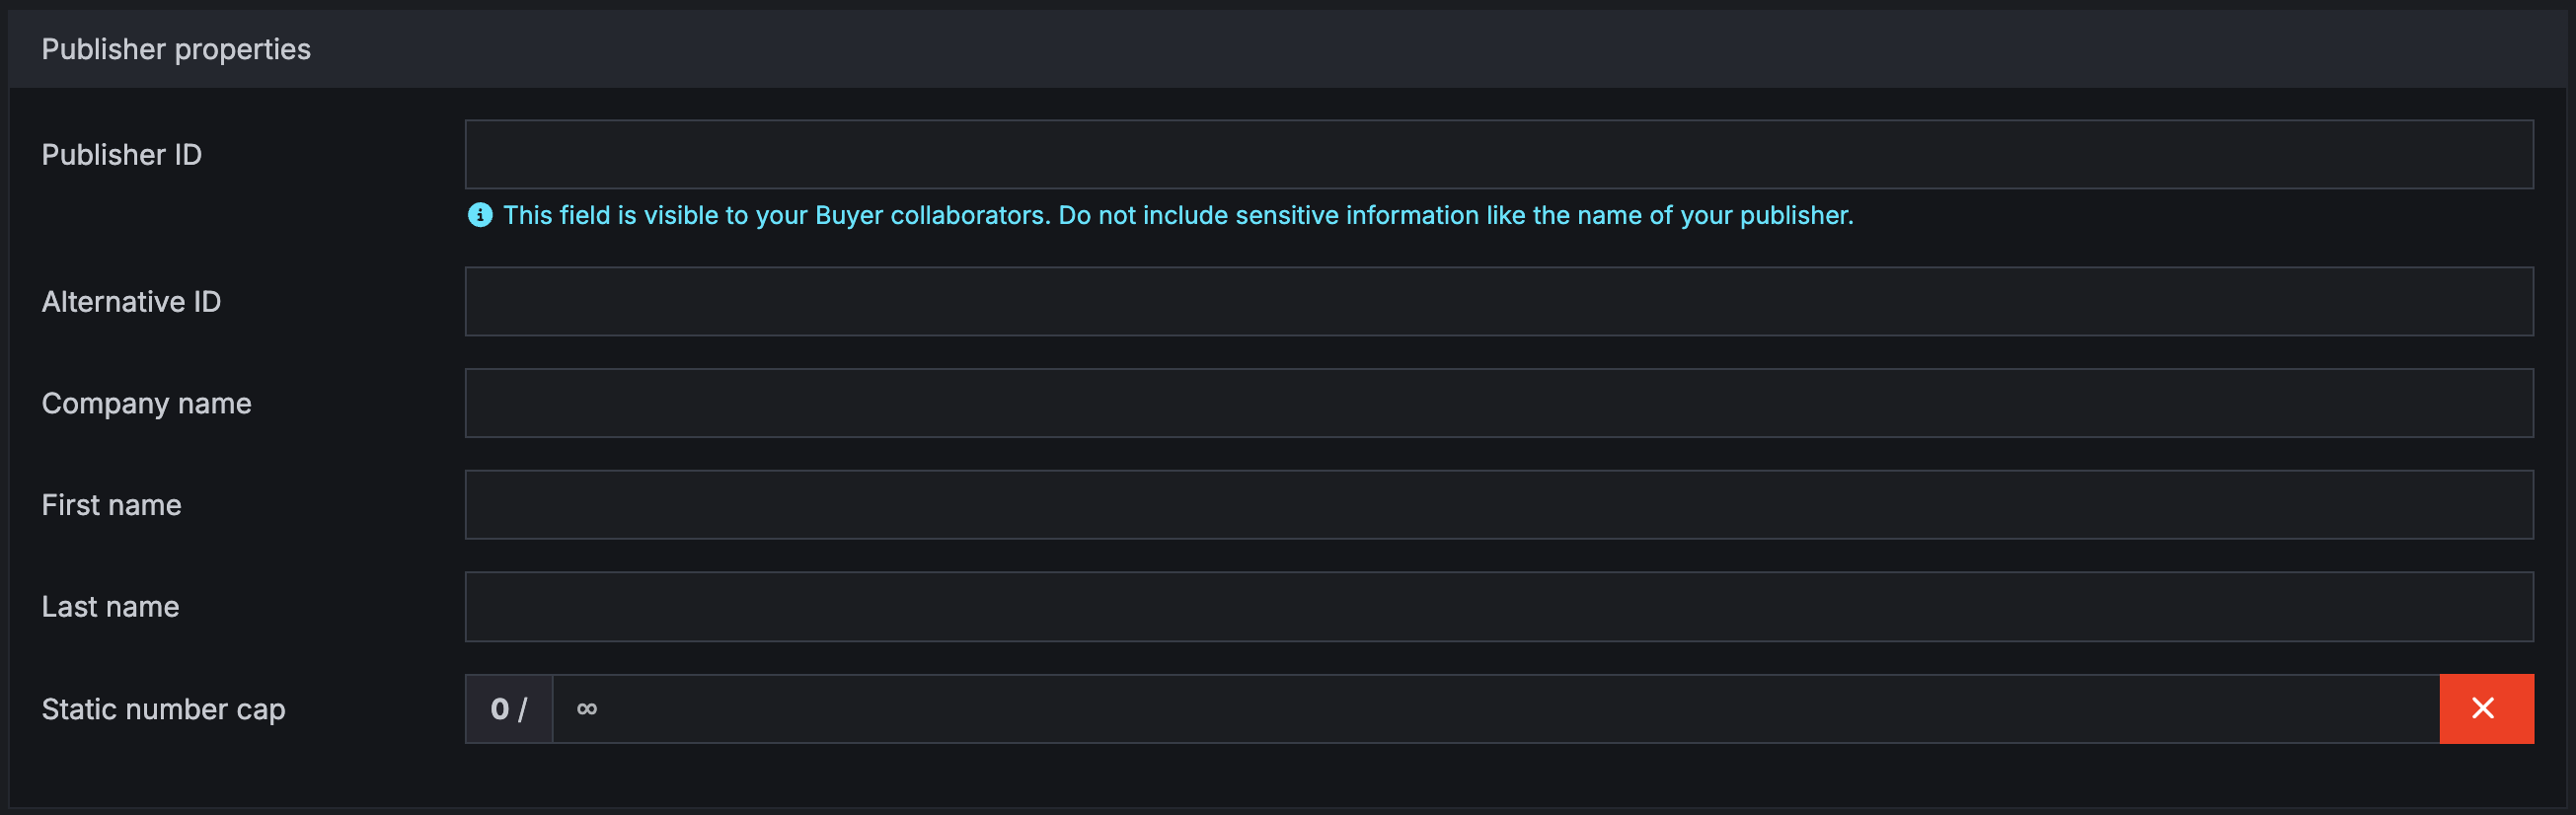
Publisher ID / Source ID: This will be the name that your buyer collaborators will be able to see. Do not include sensitive information in this field; instead, you may use a moniker such as Facebook, Adwords, PPC, Direct, etc.
First name, last name: The name of your publisher goes here. Note: If you wish to insert a company name instead of a person’s name, insert it here instead of the company name field.
Company name: Insert the company name of your publisher here as additional information to the first name and last name fields. Note: If you wish to insert only a company name without an accompanying person’s name, insert the company name in the First name field instead.
Static number cap: This is for instances when you allow your publisher to purchase their own Retreaver phone numbers to use in campaigns you have assigned them to. When you enter a static number cap, you can limit the total amount of phone numbers your publisher can purchase for their combined campaigns. Most Retreaver users keep this section blank.
Don’t forget to save your updates by clicking Create Publisher at the bottom of the page (the button may read Create Source depending on nomenclature).
2. Creating Buyers
All Retreaver campaigns must have a buyer that calls are routed to. Click to add a buyer here.
To create a buyer, click on Contact Handlers on the main sidebar. In the dropdown, select Call Endpoints and create a new buyer at the top of the page (may be labeled handler or call handler).
Call Endpoint Properties
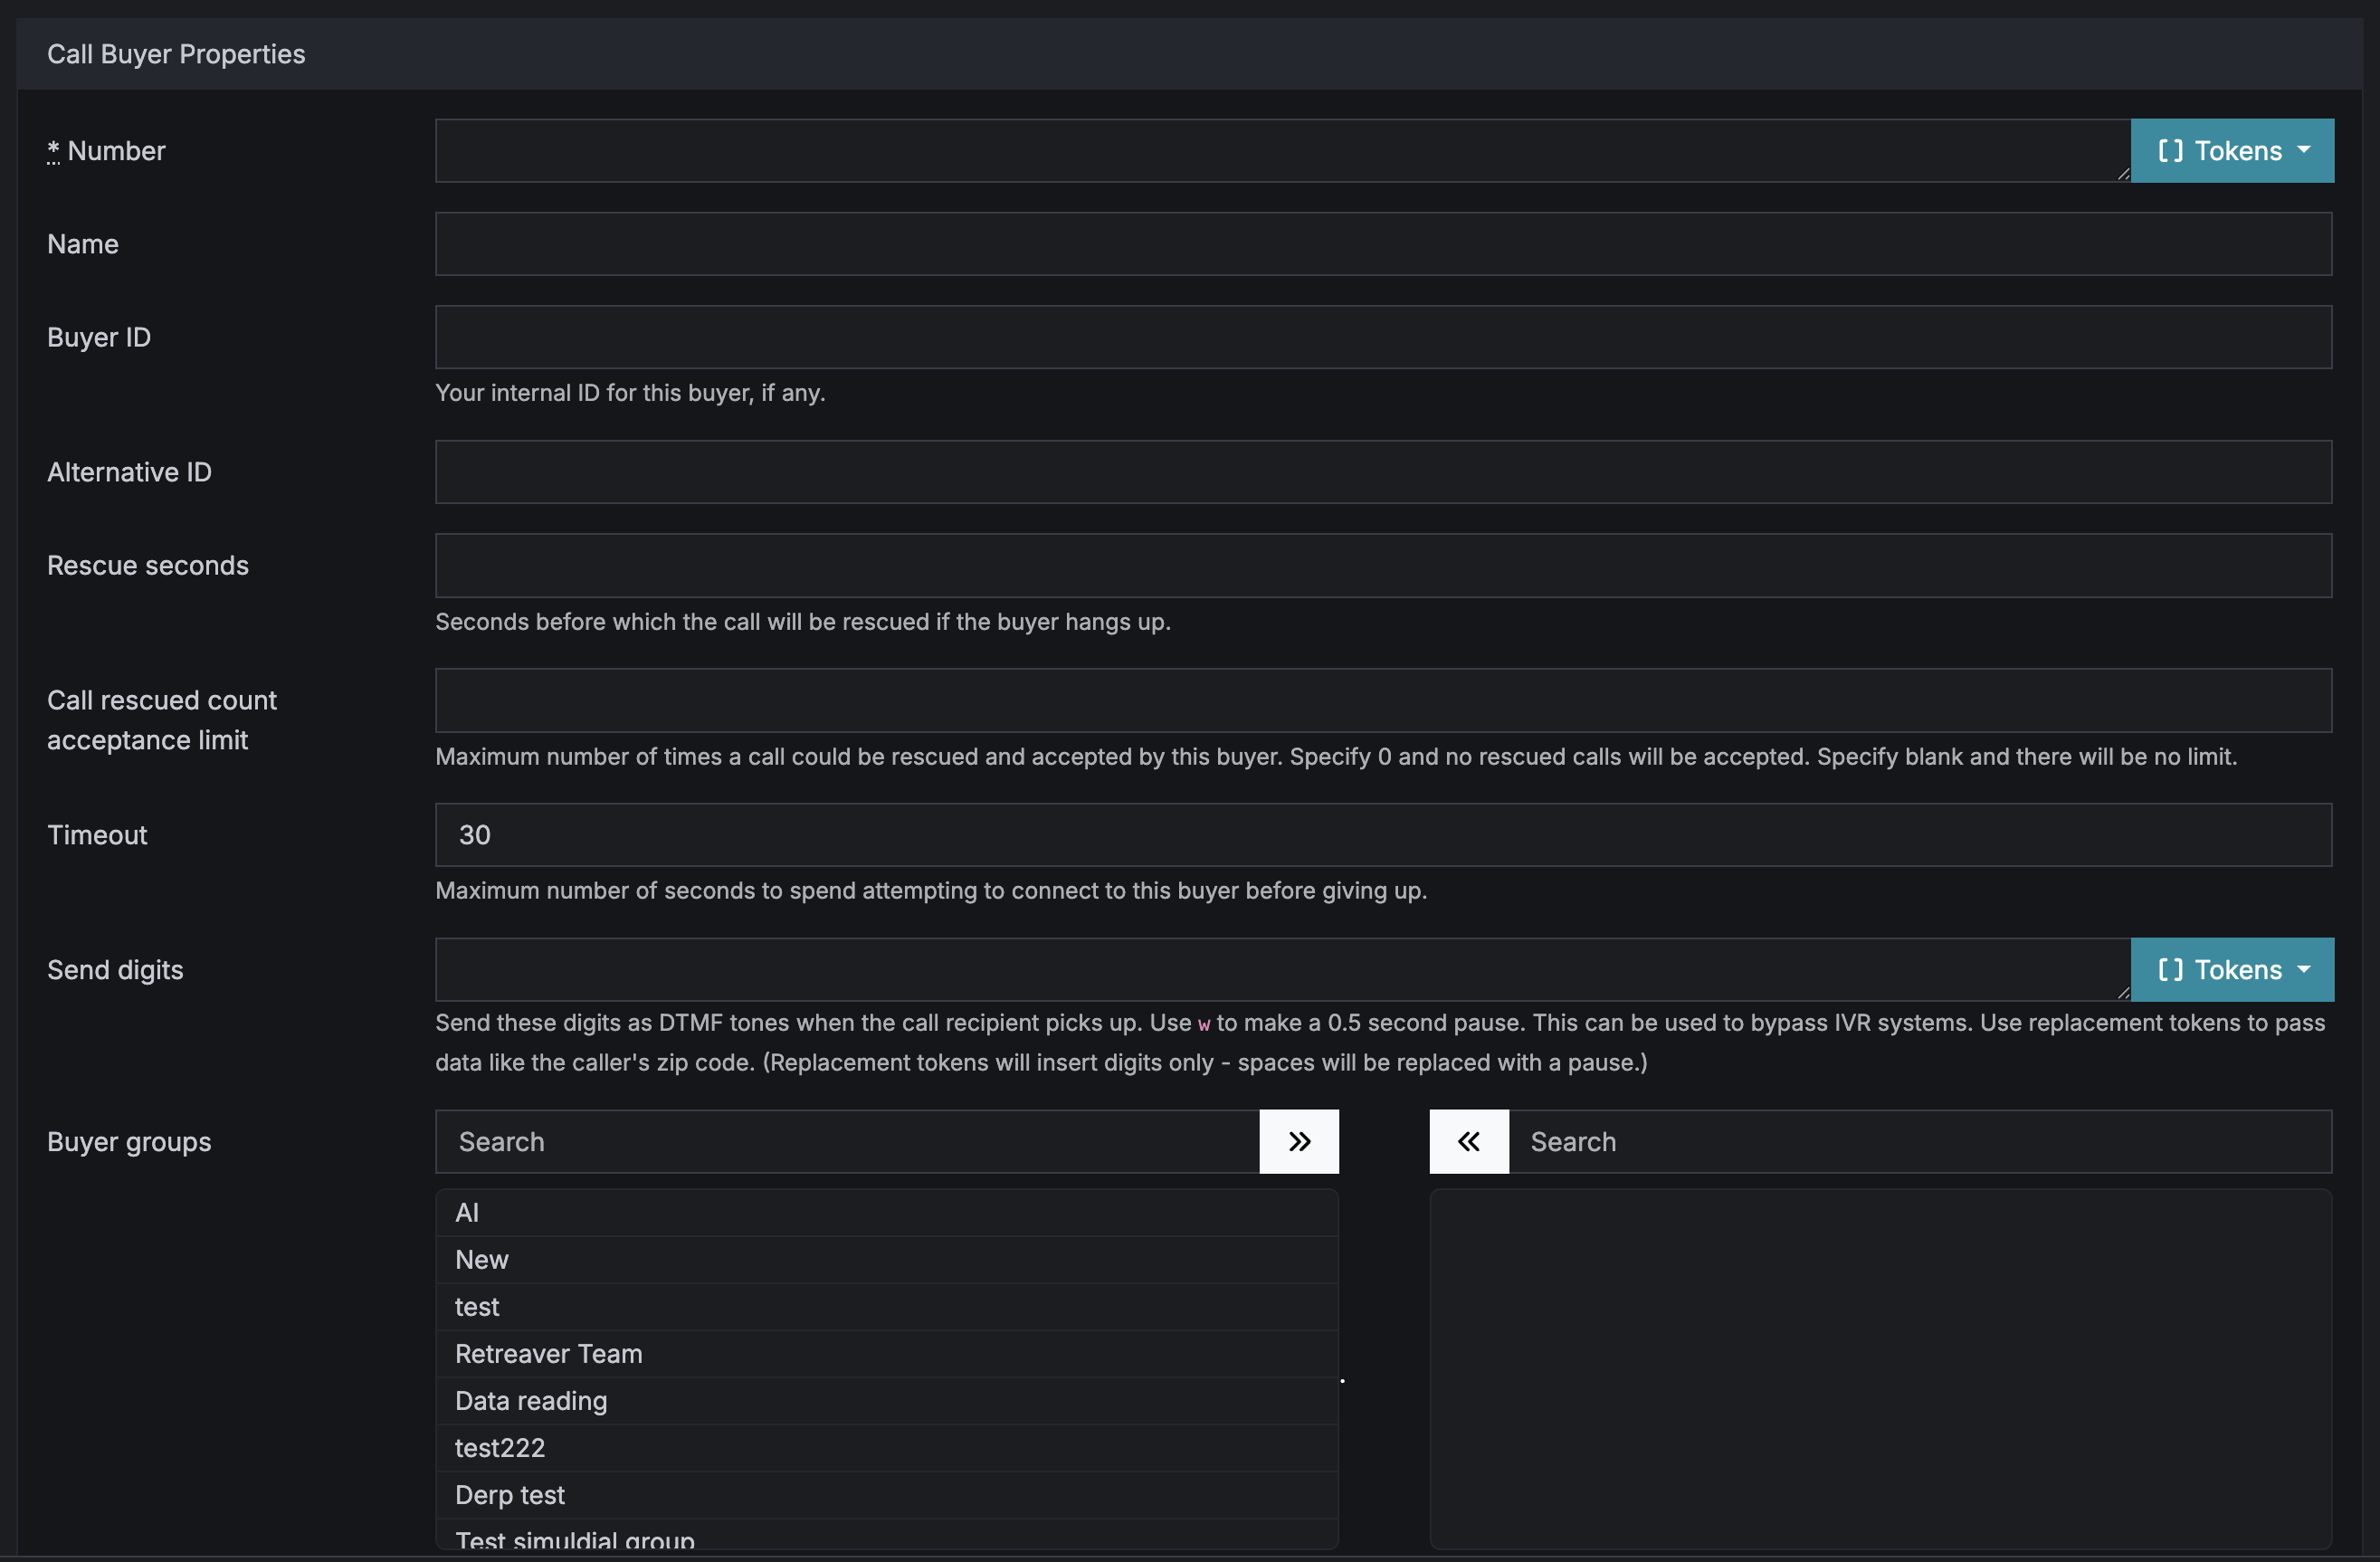
Number: The phone number of your buyer. Note: All North American phone numbers must have a “1” entered before the area code.
Name: The name of your buyer.
Buyer ID: The buyer ID can be used if you use other systems and wish for your internal denotations to be consistent.
Timeout: This is the number of seconds Retreaver will attempt to connect to the buyer before giving up.
Send digits: These are the digits you would like dialed in order to skip past any IVR questions your buyer may have set up, given the answers are numeric.
Business Hours

The business hours section is where you can set the hours for which calls go to your buyer.
You can manually enter business hours, or there are pre-set common business hours on the upper right hand side for your convenience. Be sure to select the correct time zone!
Priority

Priority: The priority of a buyer determines who first receives a call when multiple buyers who are open match the inbound caller’s criteria.
For example, an inbound call will first go to a buyer with a priority of 1. If that buyer does not pick up, the inbound call will automatically then go to a buyer with a priority of 2, and so on.
Weight: If there are multiple buyers with the same priority who match the inbound caller’s criteria are open, the weight of a buyer determines the ratio of calls received.
For example, if Buyer 1 has a weight of 1 and Buyer 2 has a weight of 2, then Buyer 1 will receive one call for every two calls Buyer 2 receives.
Caps
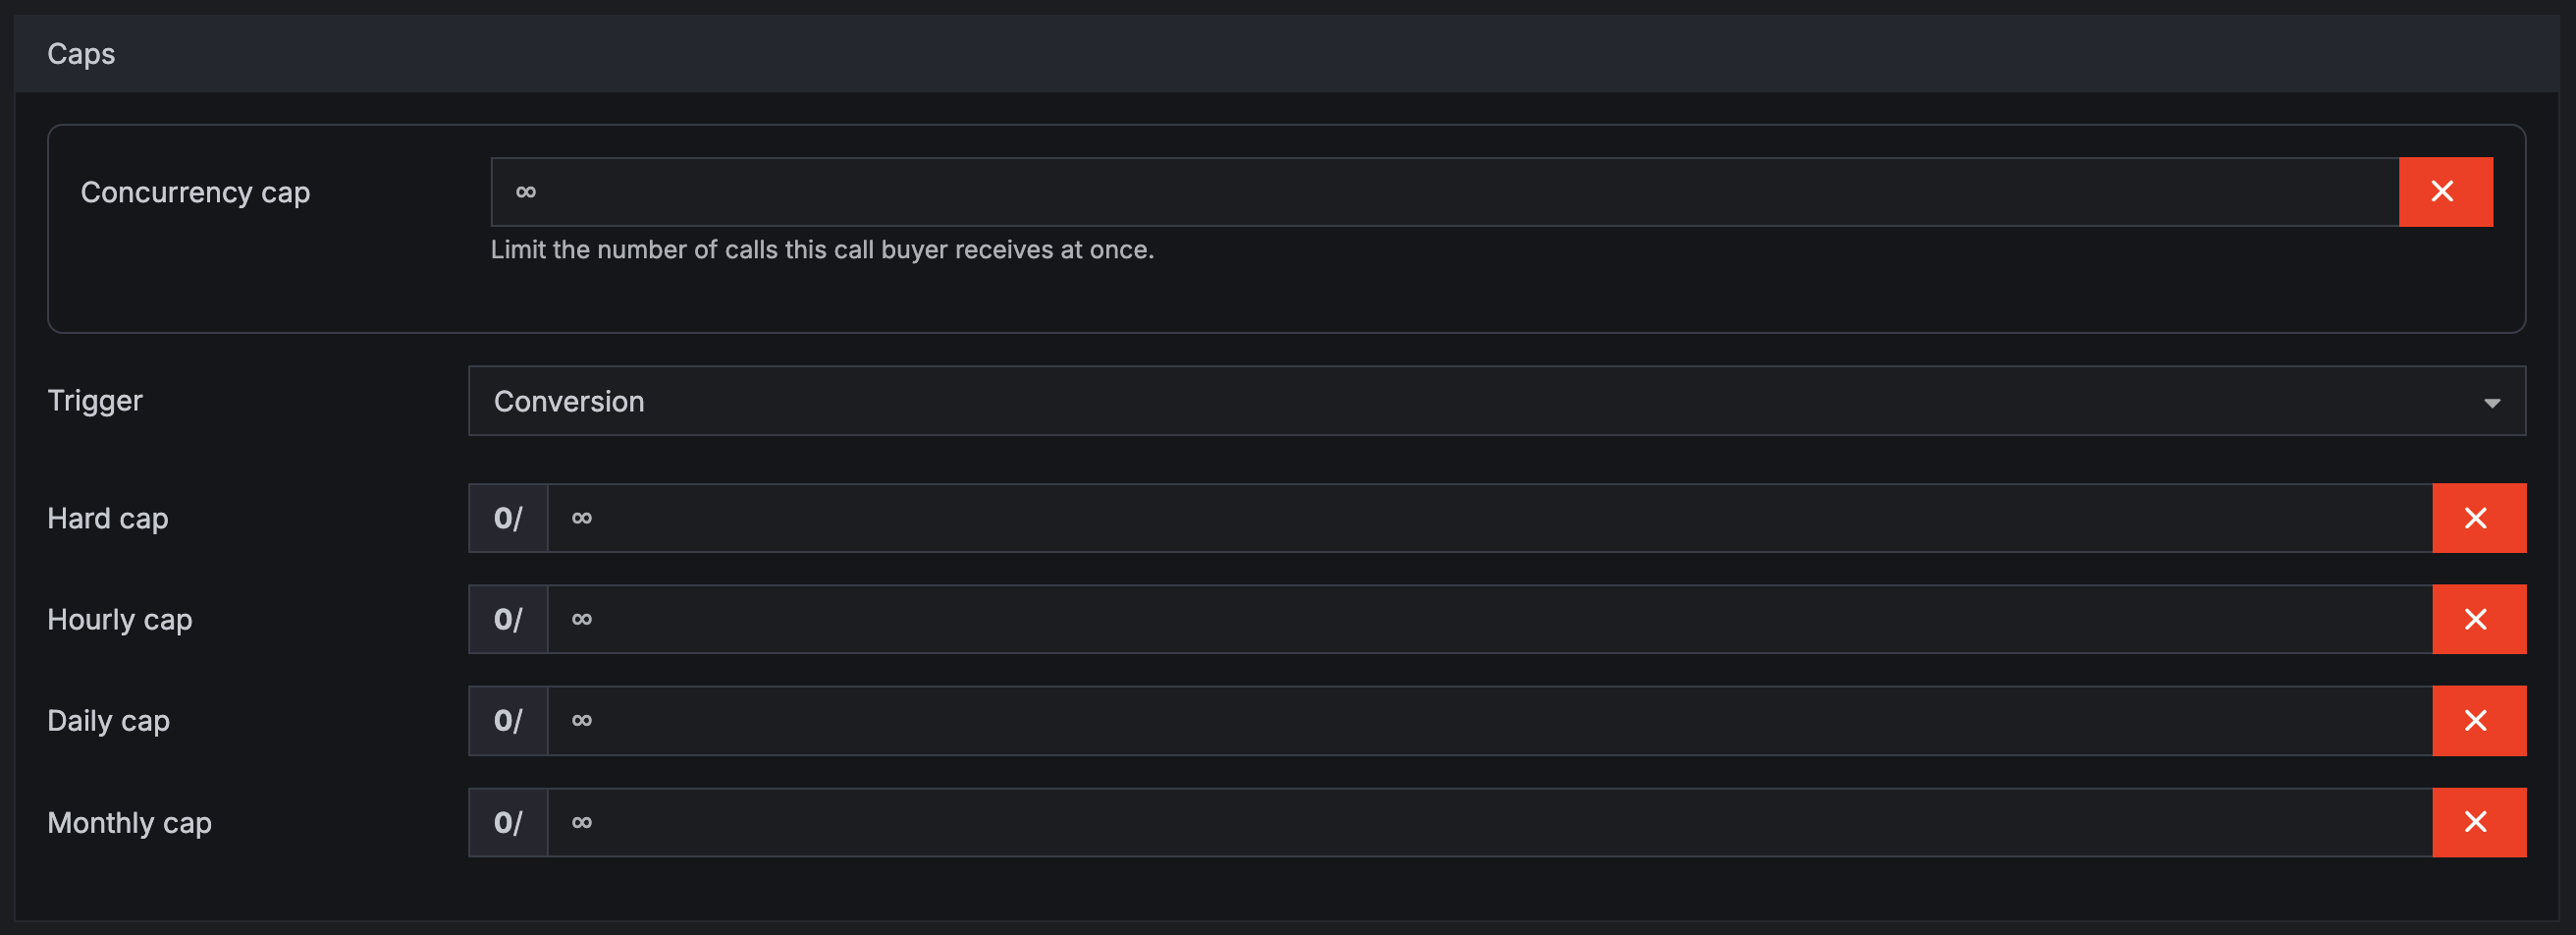
Concurrency cap: The maximum number of calls the buyer can receive at once.
Trigger: The action that triggers payment: conversion or connection.
Hard cap: The total cumulative number of calls that a buyer can receive, ever.
Hourly cap: The maximum number of calls the buyer can receive in the span of an hour.
Daily cap: The maximum number of calls the buyer can receive in the span of a day.
Monthly cap: The maximum number of calls the buyer can receive in the span of a calendar month.
See our full guide on Buyer Caps
Tags
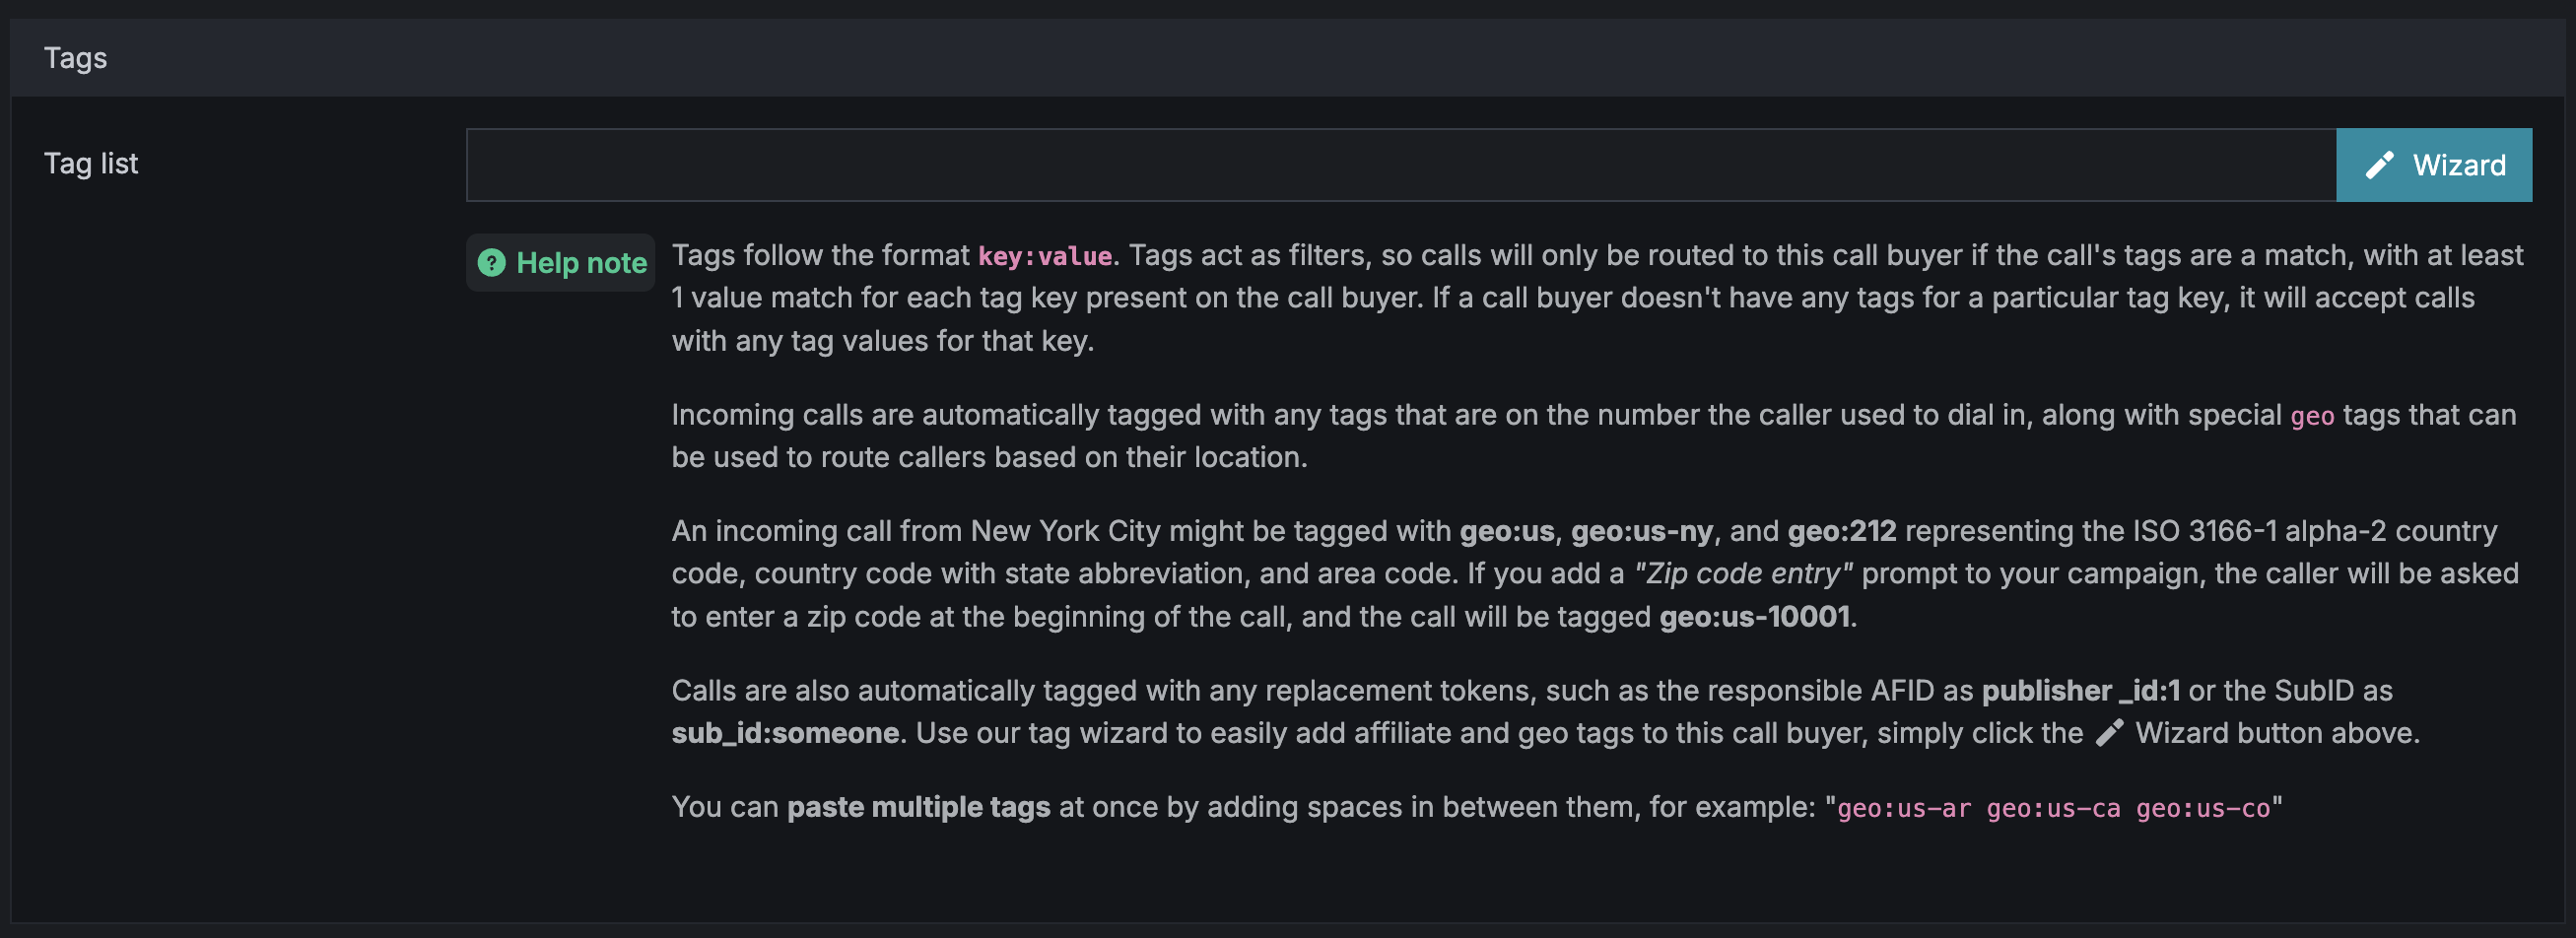
One of Retreaver’s more advanced functions is the use of tags, which are more geared towards advanced users. Applying tags to buyers will give you the ability to route calls to certain agents based on any criteria you specify. By placing a tag in the buyer (handler) section, you are defining the criteria that a call must have in order to be routed to a buyer.
For example, you can choose to route calls to a buyer based on the criteria that they come from certain states or include a specific caller attribute, such as selecting their preferred language as Spanish on the IVR. Or, perhaps your buyer only wants calls where the caller can afford a certain monthly insurance premium, or are under a certain age. All these are tags that you are able to add to help filter your calls.
To learn more about tags and how to use them, How to Use Tags to Route Calls to Specific Endpoints and Buyers.
Collaboration
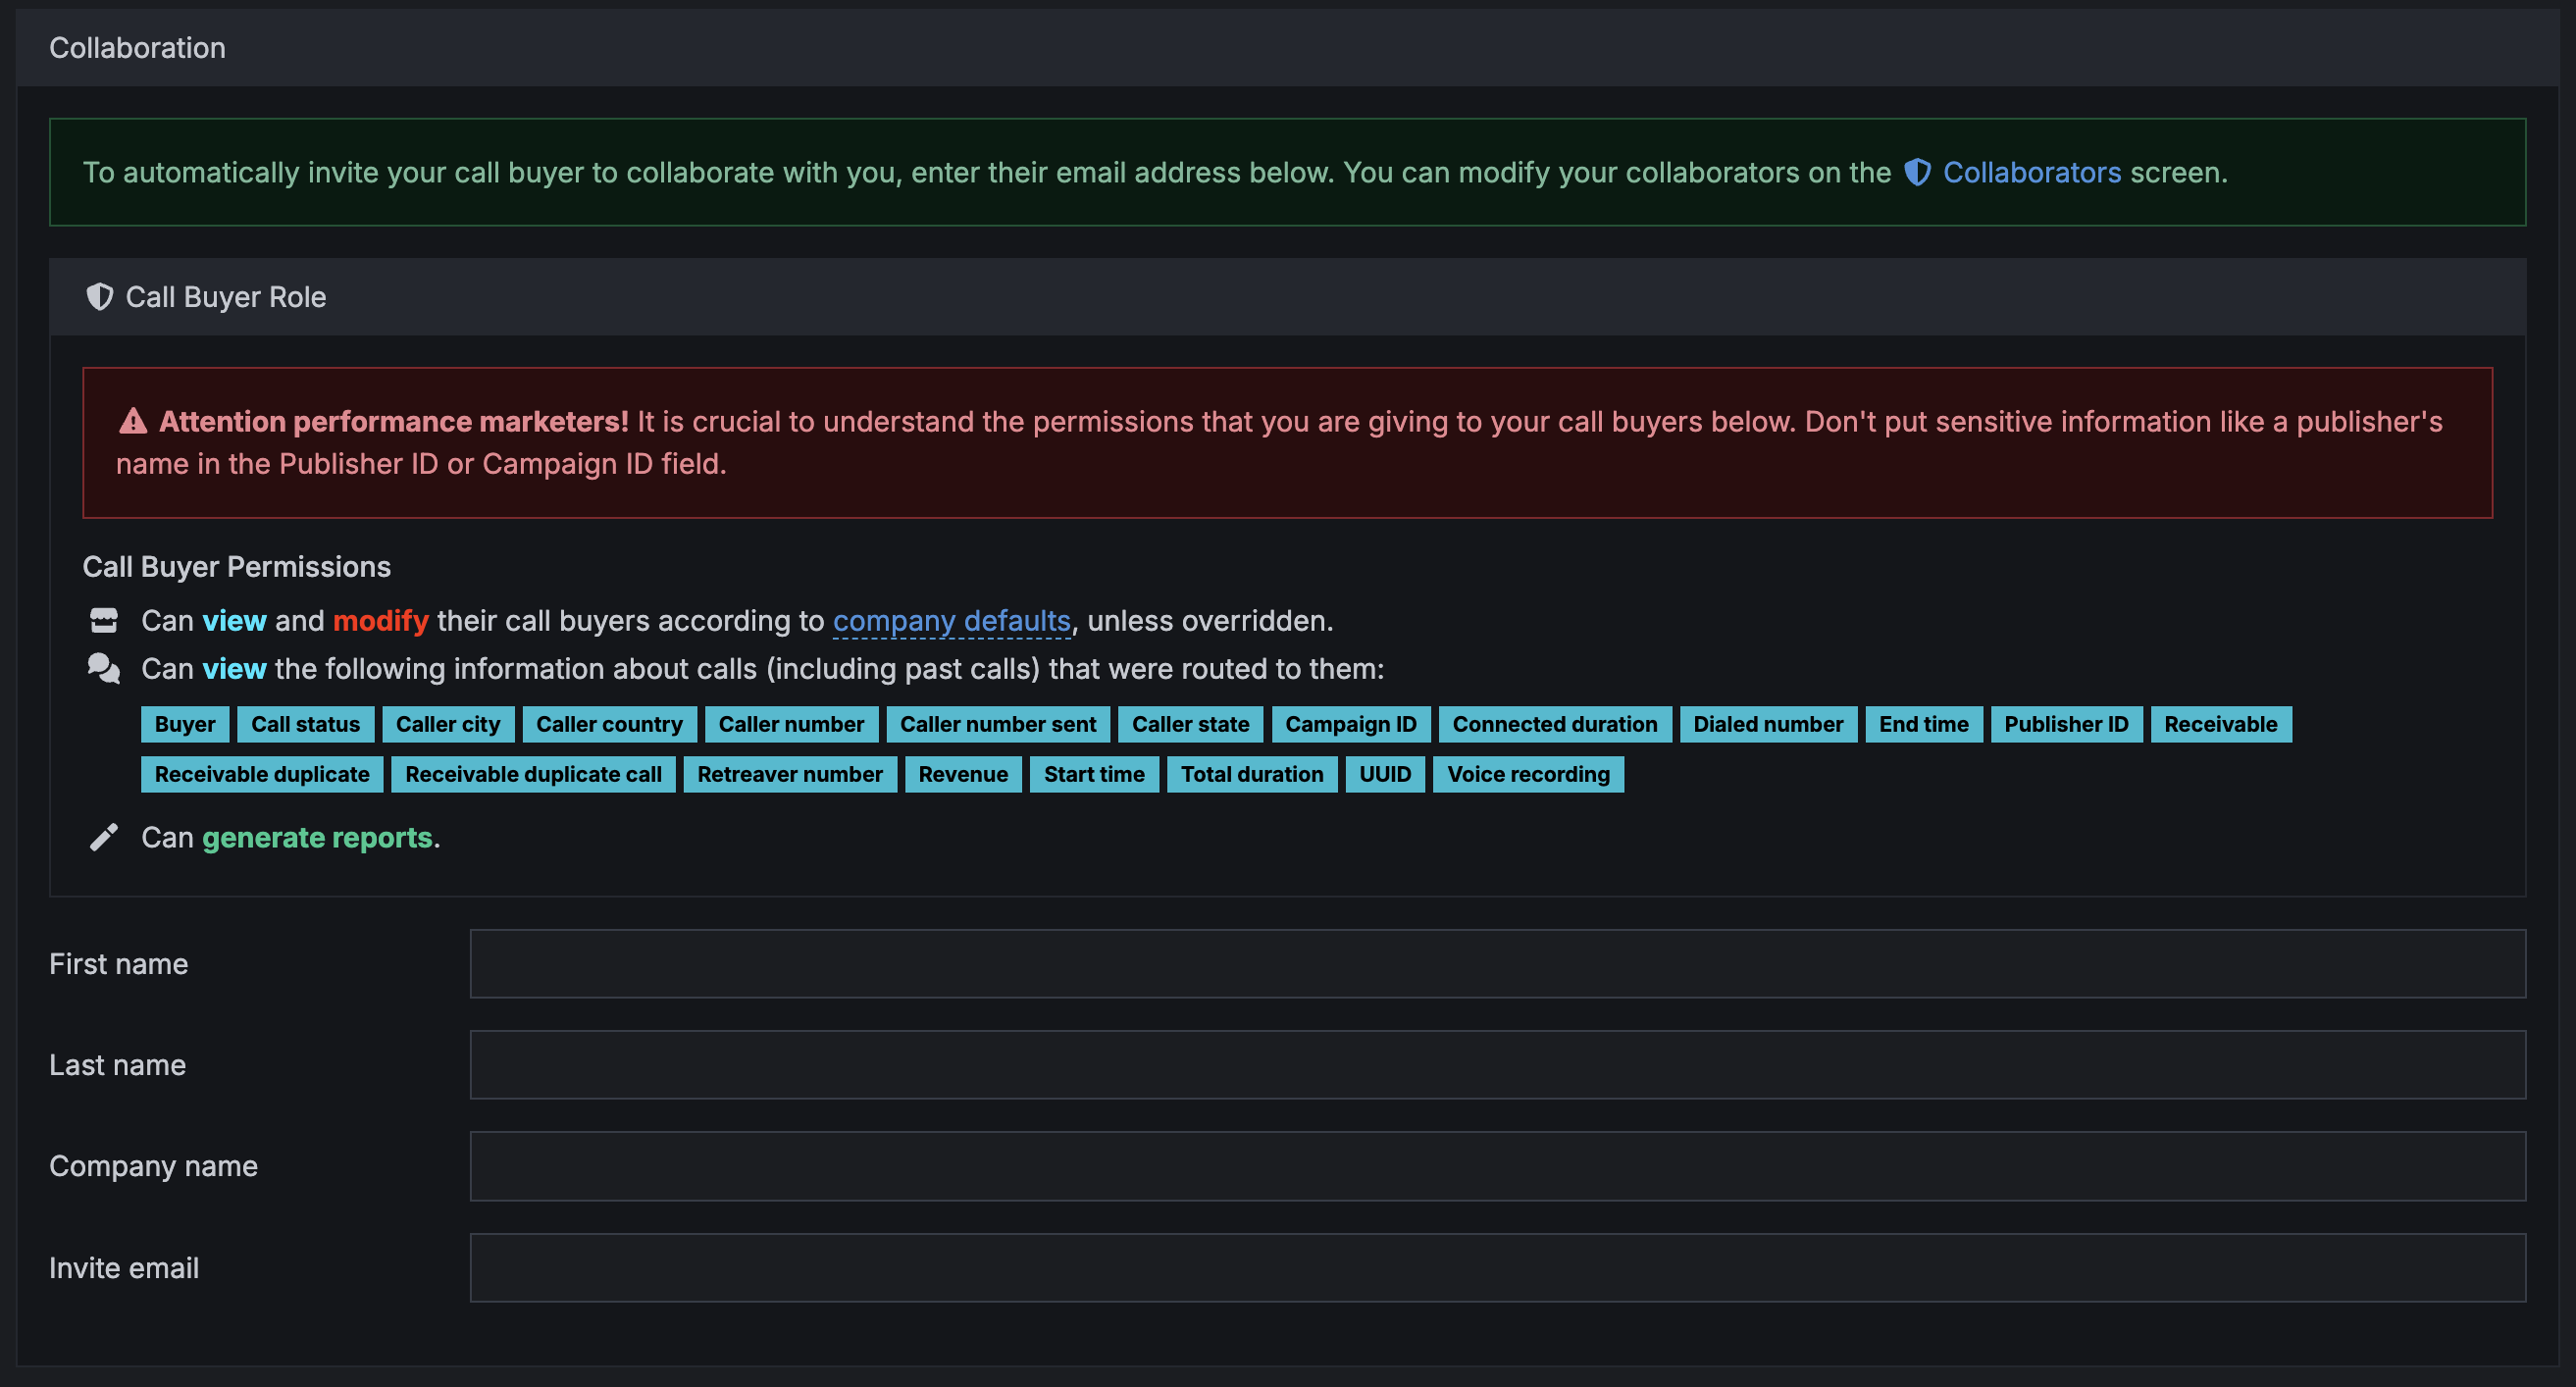
The collaboration section allows your buyer to see certain sections of your Retreaver reporting.
Don’t forget to save your updates by clicking “Create Call Endpoint” at the bottom of the page.
3. Creating a Campaign
Once you have your publishers and buyers set up, it’s time to actually create your campaign. Within your Retreaver account, click Campaigns on the main sidebar, then New Campaign at the top of the page.
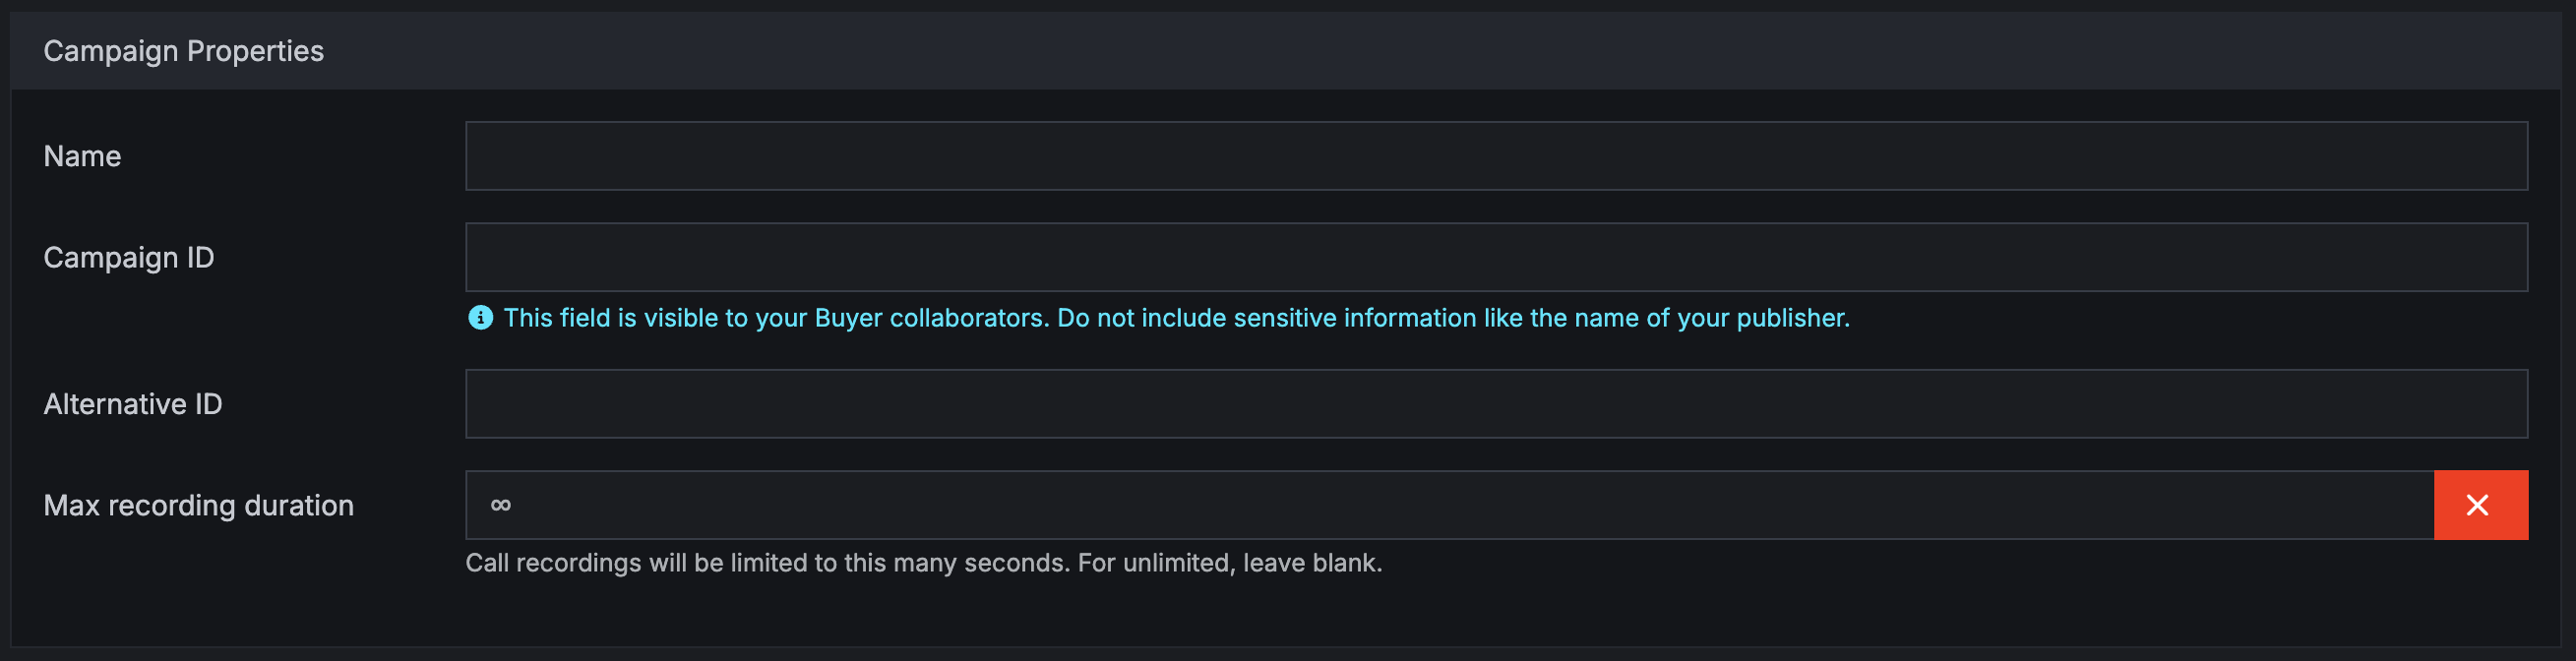
Name: The name of your campaign goes here.
Campaign ID: Most users will leave this section blank, but if you use other systems, you may choose to assign a campaign ID to match the campaign ID you have assigned in other systems.
If the section is left blank, then a campaign ID will be automatically generated inside Retreaver once your campaign is created.
Routing Settings
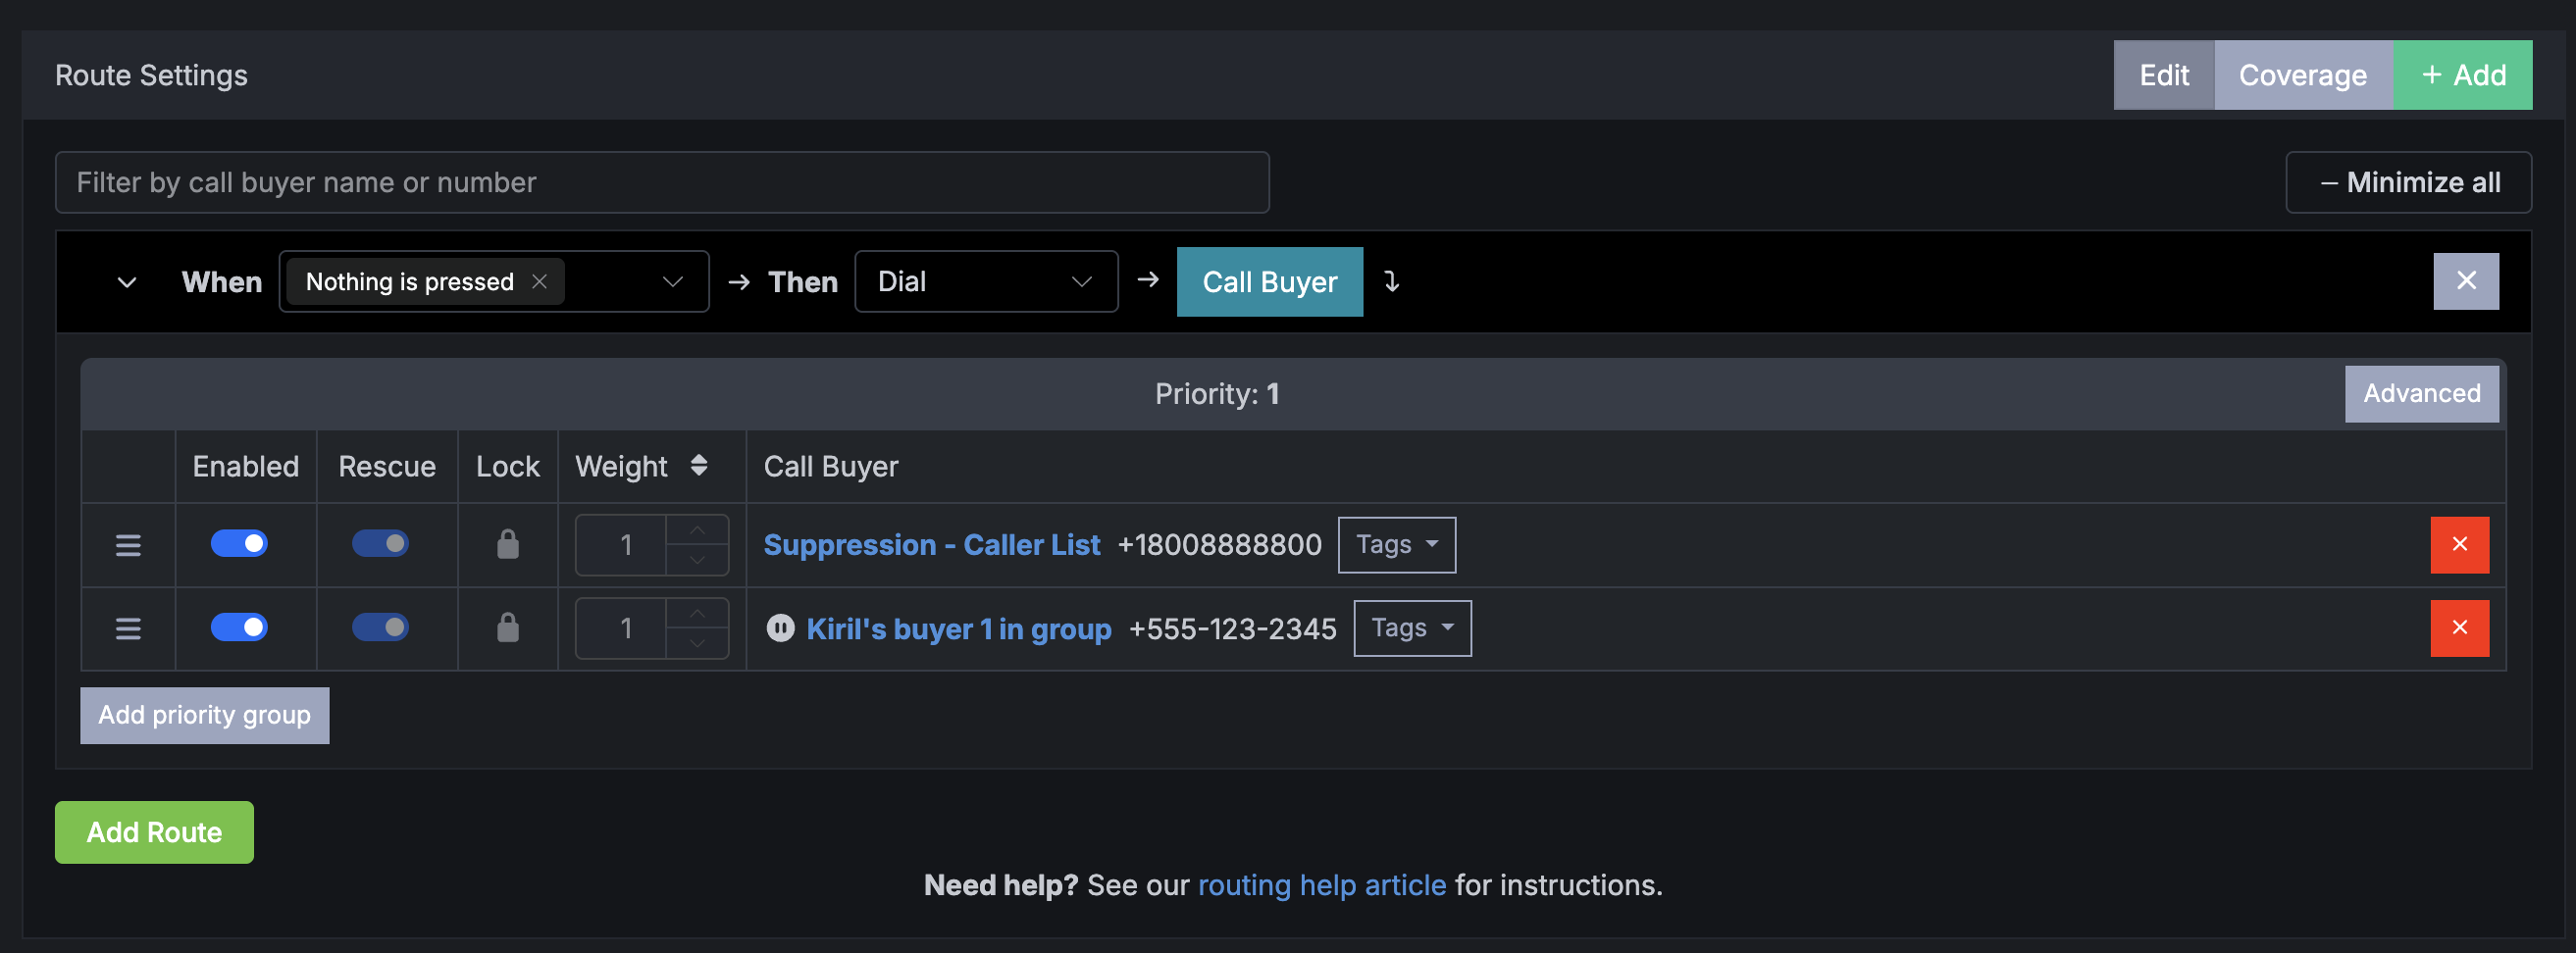
Routing settings are the rules and logic the dialed phone number follows in order to connect a caller to a buyer. The routing settings section allows for streamlined management for:
- Buyer priority and weight
- Assigning multiple caller actions to a route
- Disabling buyers
- Viewing coverage across all buyers on a campaign (states, business hours)
Once your buyer settings have been set up, the routing settings section simplifies common tasks and allows for easy administration of existing buyer settings all in one place.
For a comprehensive guide on routing settings, click here.
Prompts
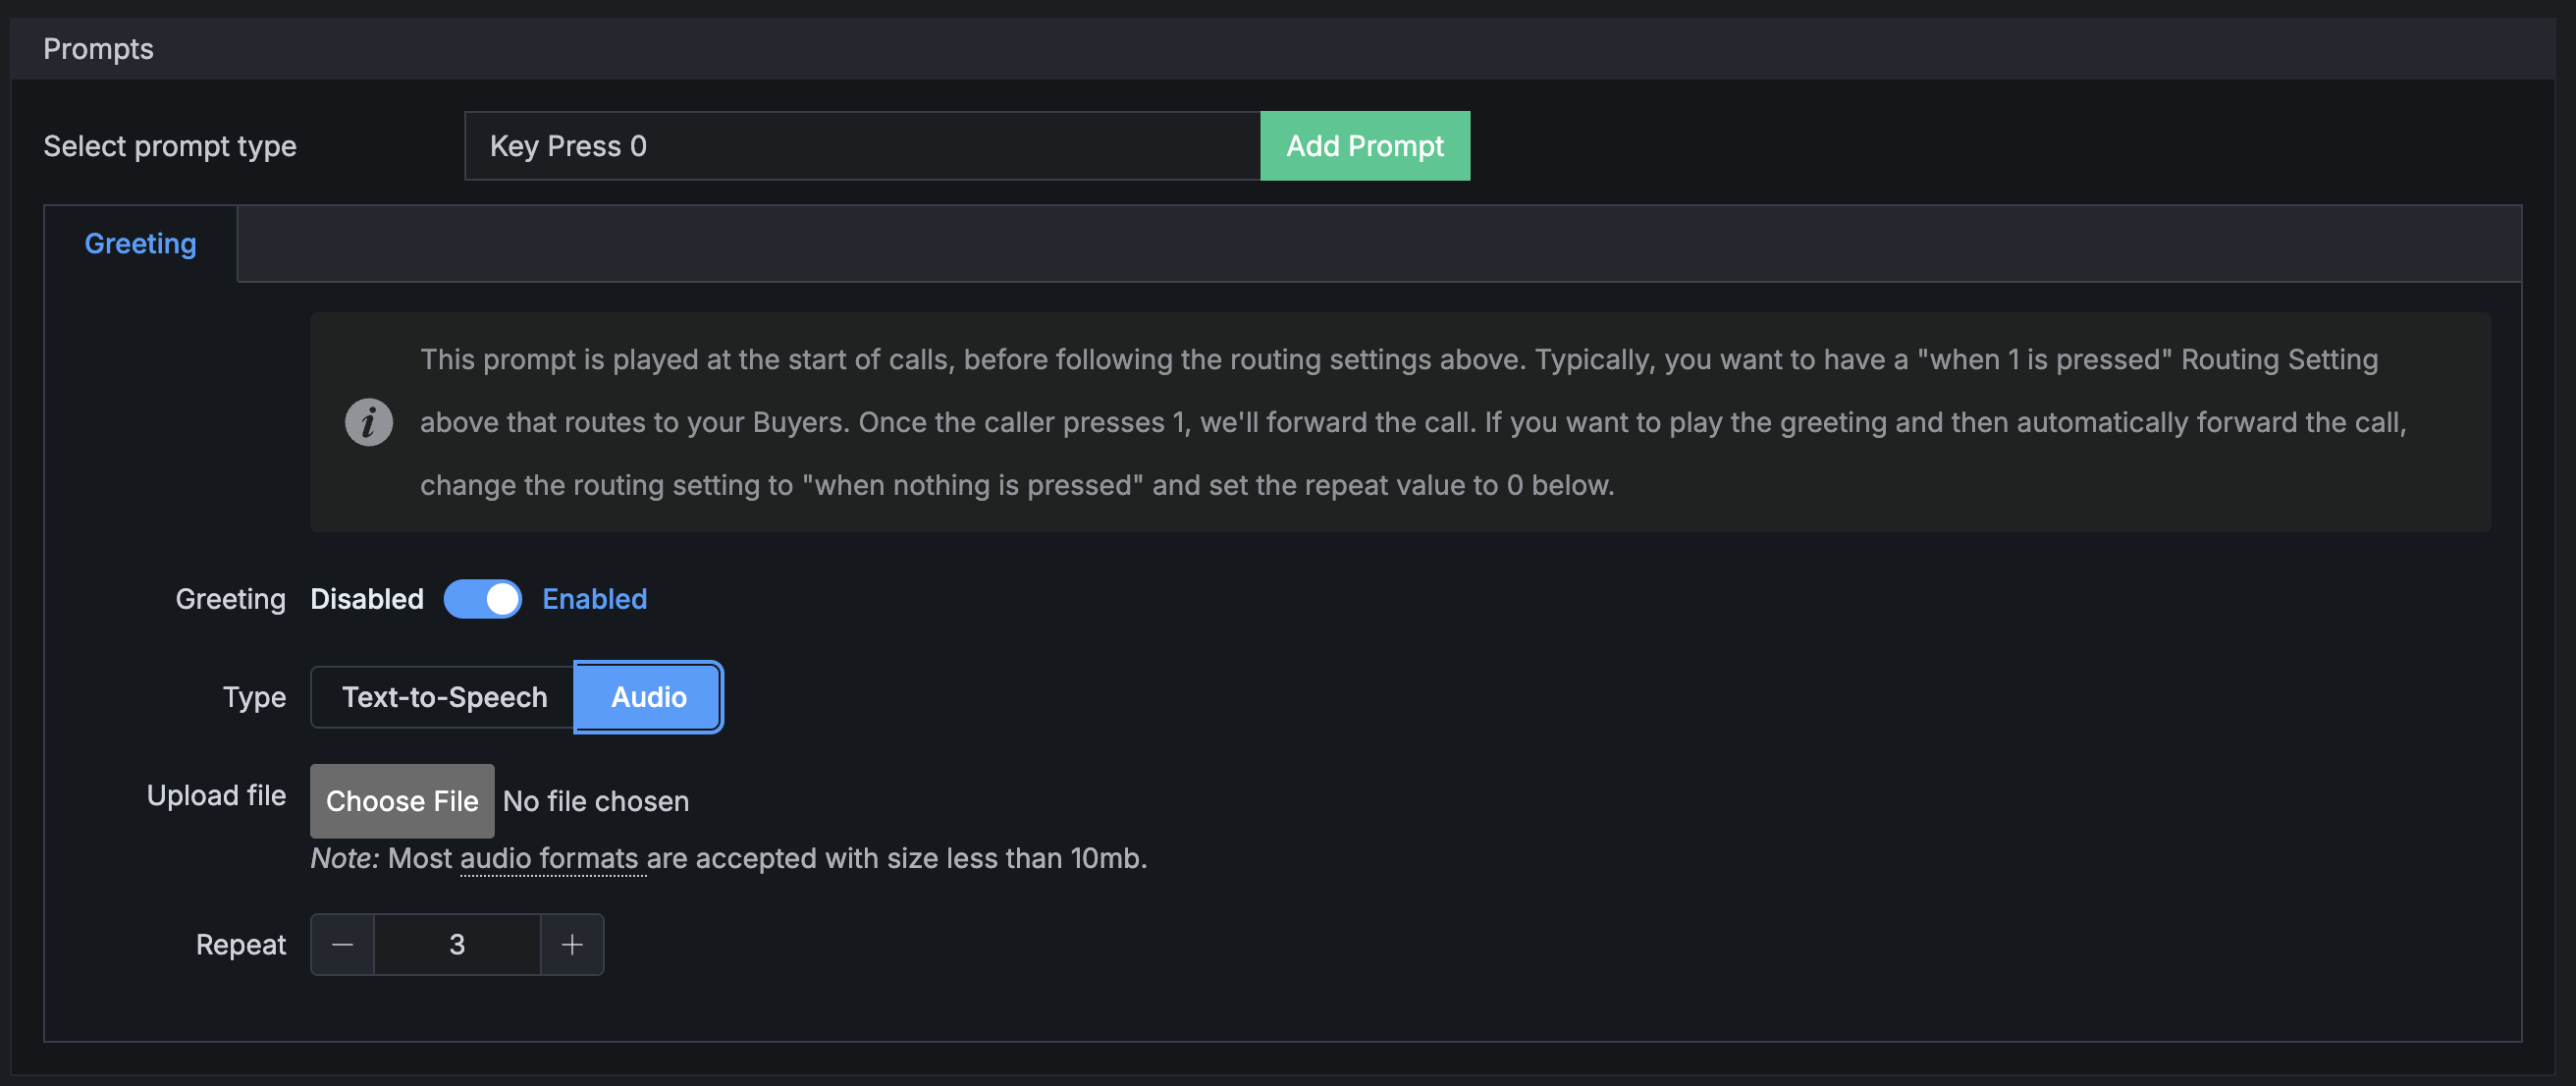
The prompts section is where you can set up any IVR greetings or prompts you would like on your campaign:
- Welcome messages
- Number selection prompts
- Directories
- Responses after a number selection
- Whispers to call center agents with caller information
For a comprehensive guide on prompts, click here.
Conversion Criteria
This section defines the criteria for a call conversion.
Timer
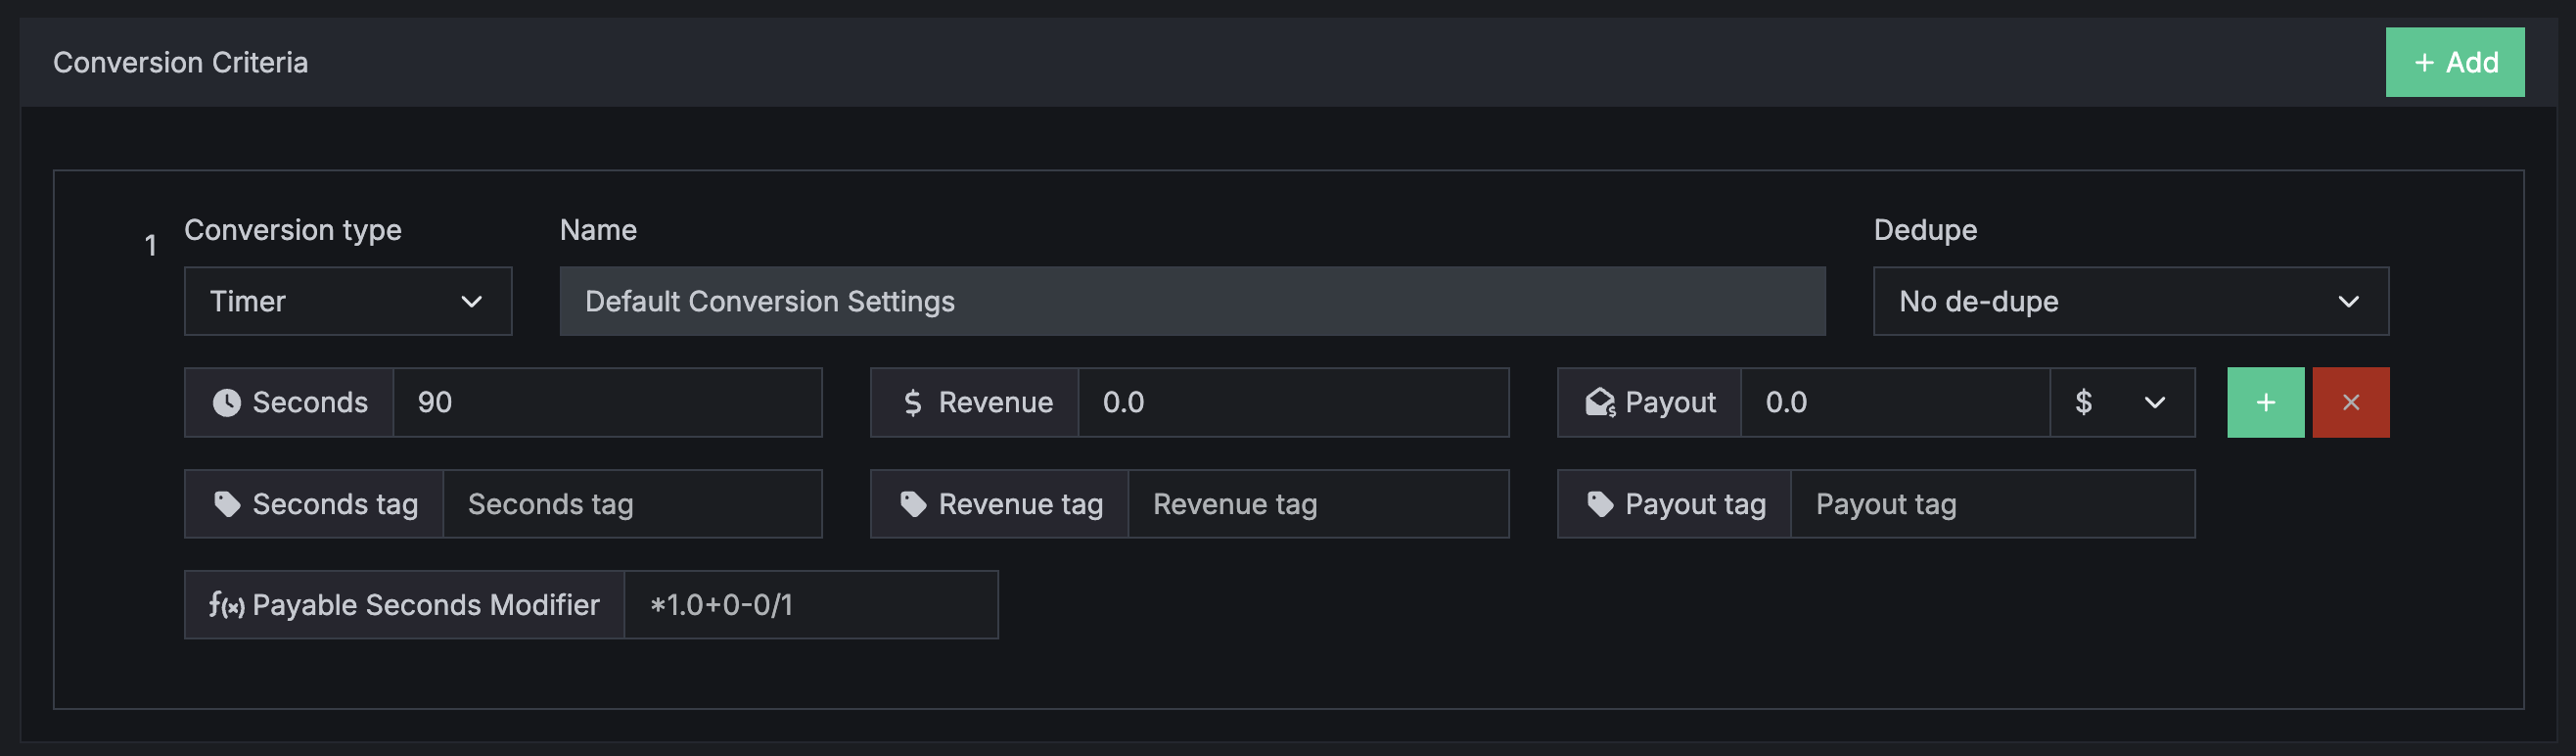
Timer is the common default conversion group among Retreaver users.
Seconds: Number of seconds that a call must be connected to trigger a call conversion.
$ Revenue: Amount you are paid for a call.
$ Payout: Amount you pay for a call.
De-dupe dropdown: The maximum number of times a call can be deemed payable in a given duration.
Attempt
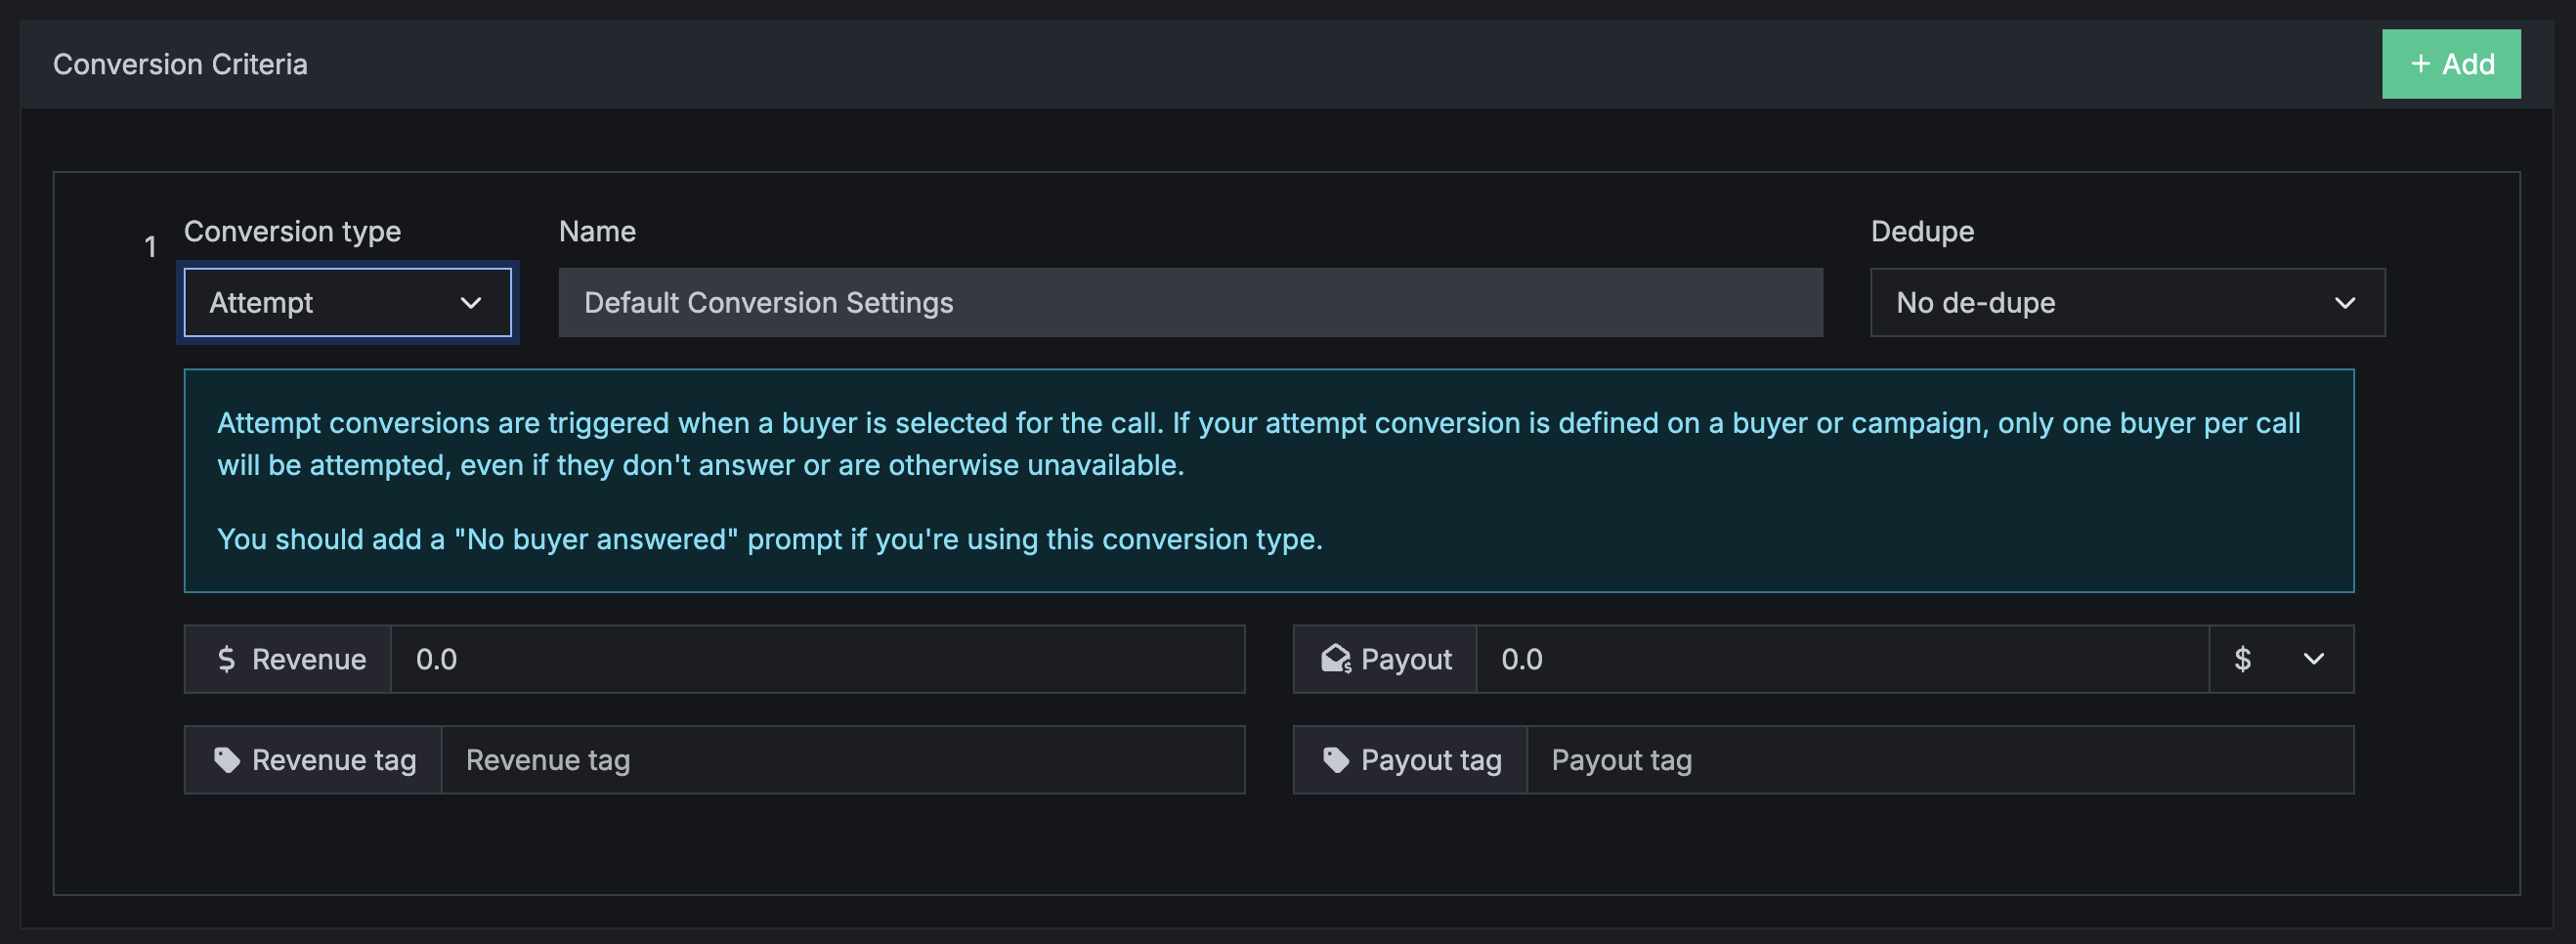
Attempt conversions are triggered when a buyer is selected for the call. If your attempt conversion is defined on a buyer or campaign, only one buyer per call will be attempted, even if they don’t answer or are otherwise unavailable.
You should add a “No buyer answered” prompt if you’re using this conversion type.
$ Revenue: Amount you are paid for a call.
$ Payout: Amount you pay for a call.
No de-dupe dropdown: The maximum number of times a call can be deemed payable in a given duration.
Postback

If you are integrated with a buyer CRM, the postback options allows for Retreaver to wait for your CRM to respond before marking a call as converted. Postback conversions are geared towards more advanced users of Retreaver. To learn more about the buyer postback function, click here.
If your buyers and publishers get paid at different times or have different conversion criteria (e.g. if you buy calls on a revenue sharing model, and sell to a buyer on a pay-per-call performance model), then you may customize the conversion criteria to reflect your needs using the split conversion feature. To learn about split conversions, click here.
Webhooks
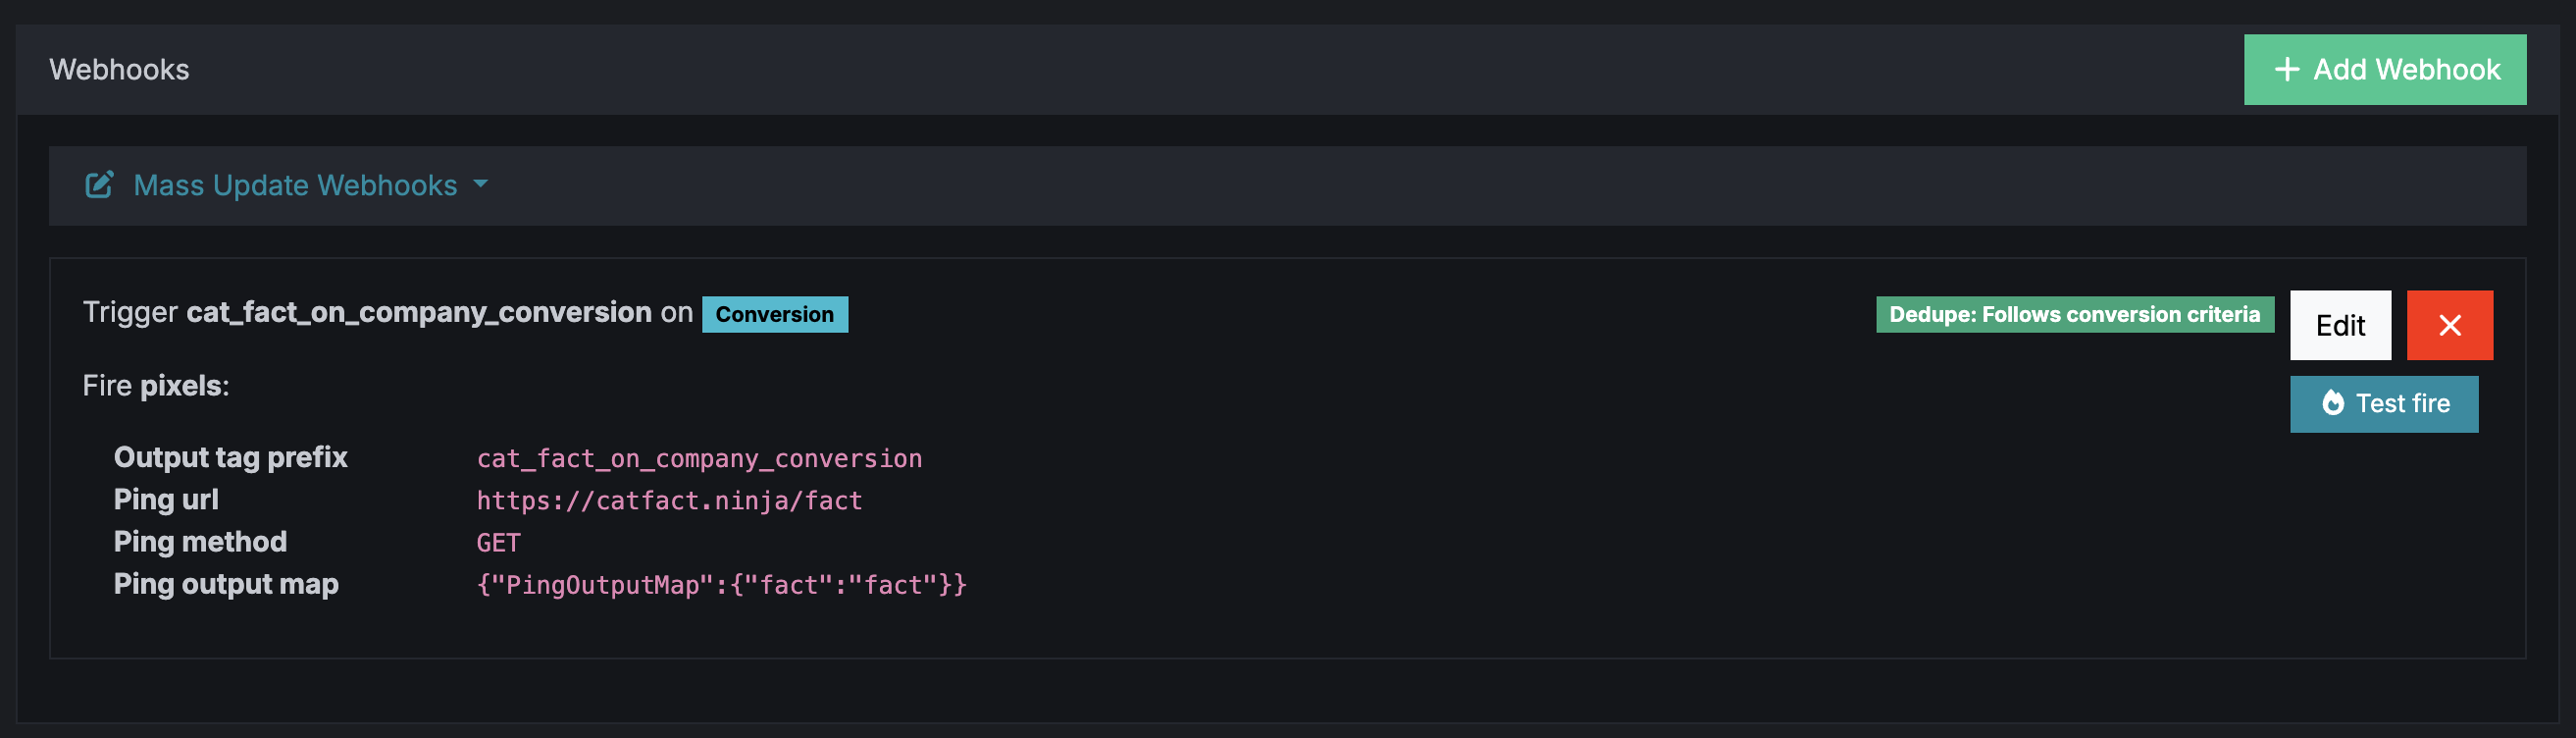
Webhooks allow users to send call data to a third party during or after a call. They are used to integrate with a CRM system to create or update caller profile information, process conversions, or update reporting and analytic systems with newly gathered call data. Retreaver uses replacement tokens to insert tag values into your webhooks.
For a comprehensive guide on webhooks, click here.
Don’t forget to save your updates by clicking “Create Campaign” at the bottom of the page.
For more information on Campaign Toggles, Collaborator Permissions & Retreaver JS settings: View our Campaign Usage And Terminology guide.
4. Adding Numbers to Your Campaign
Now that you have created a campaign, it’s time to assign numbers to it so you can receive inbound calls.
There are two ways to add a number (or multiples numbers) to your campaign depending on your desired usage:
1) Manually create a single static number to associate with your campaign
- Any call centers you work with can use this static numbers to hand off inbound calls to you
- Ideal for offline interactions
2) Generate multiple numbers dynamically on the landing page using number pools
- Ideal for online interactions and landing pages
- Saves money by allowing you to automatically assign numbers for publishers as they reach your landing page (sources in Source/Handler nomenclature)
- Enable parameter mapping for concurrent page visits
- Supports real-time page tracking
- Numbers will be recycled back into the pool once a call is completed
Creating a Static Number
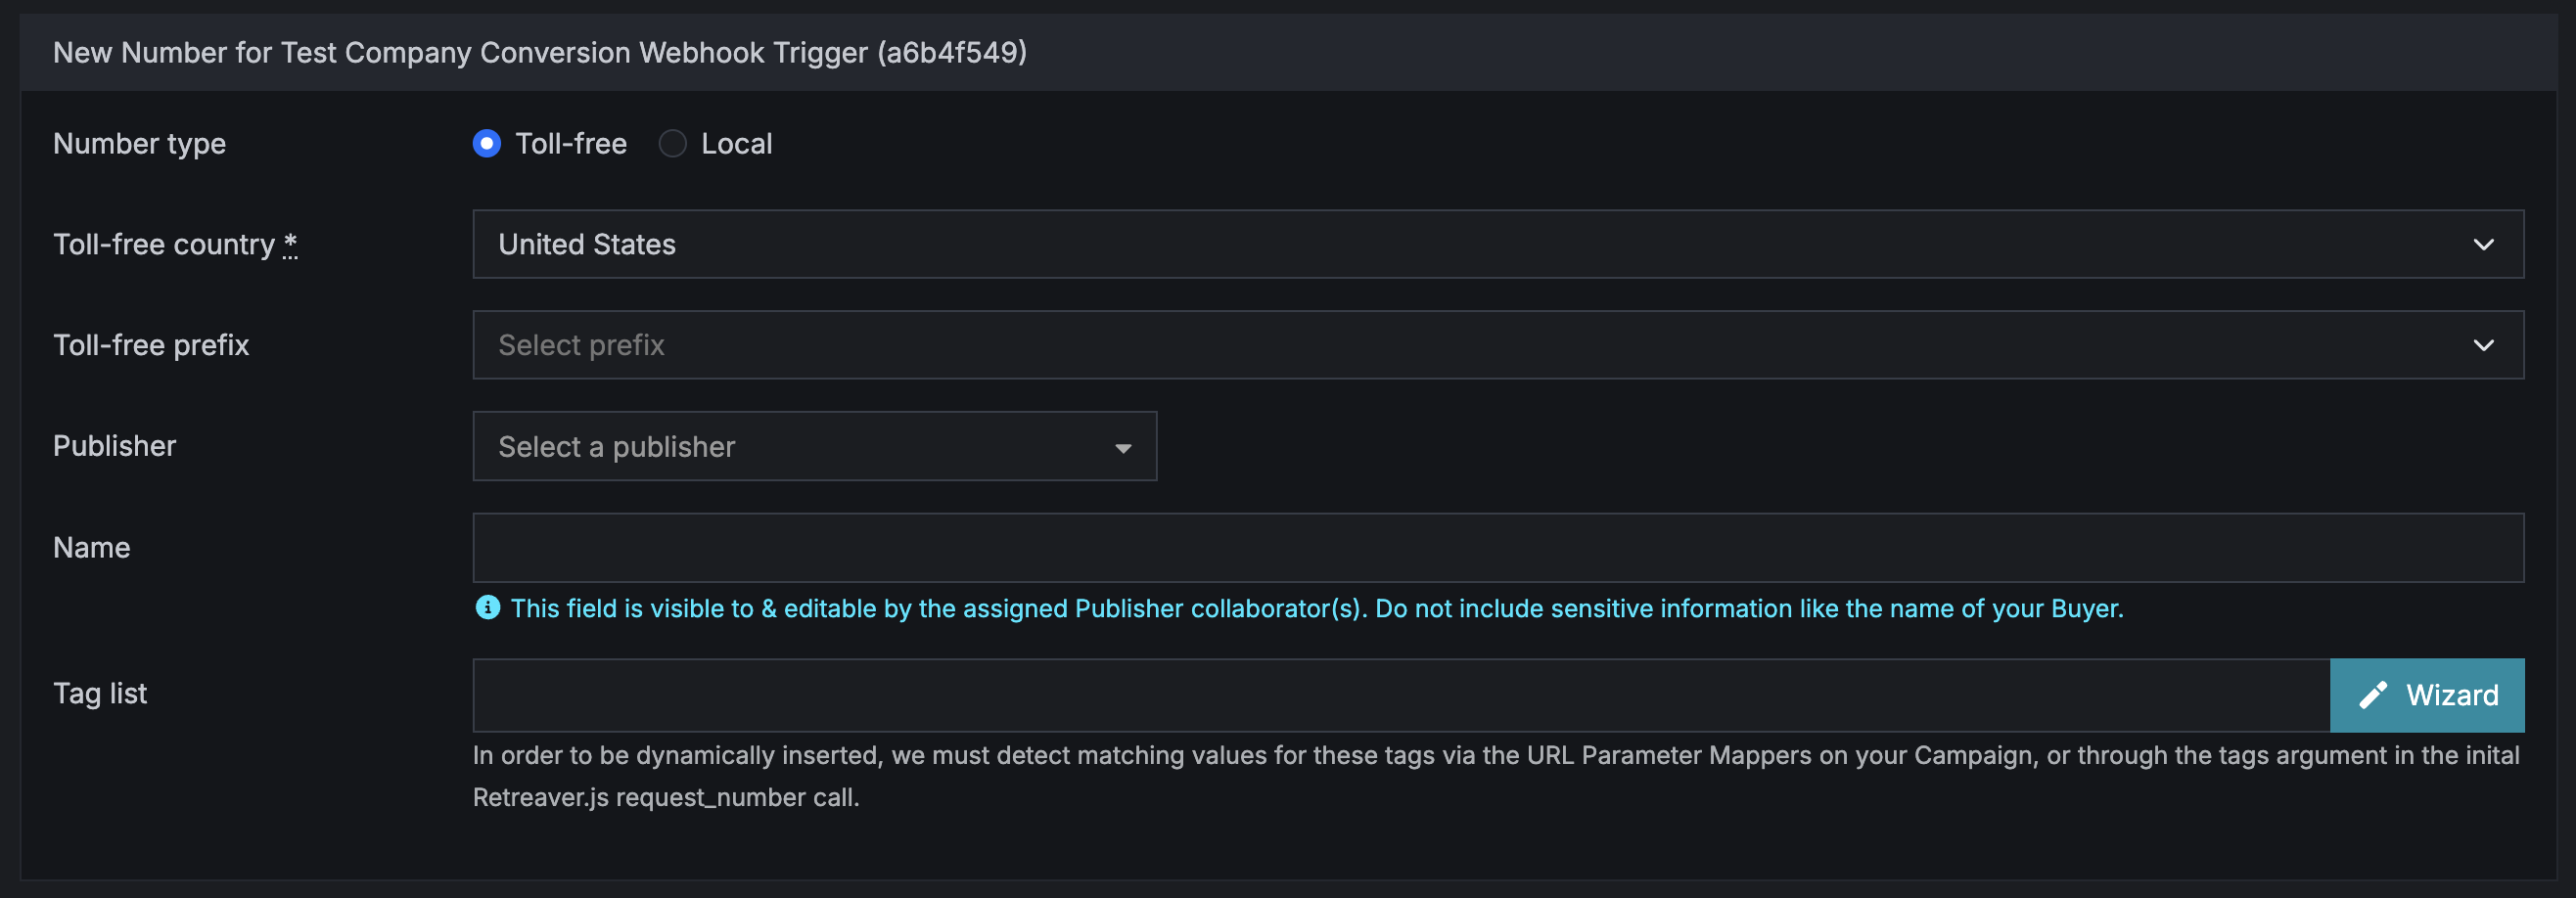
Within your existing campaign, click “New Number for Campaign” at the top of the page. You will be brought to the page below, where you can enter the information you would like associated with your campaign number.
The Wizard function allows users to add additional data or logic on a phone number. This means that Retreaver will either only accept calls which meet specific criteria, or reject calls based on criteria provided, such as:
- Geo: Calls coming from a specific geographical location or ZIP code
- Text: Calls associated with specific tag criteria
- Publisher: Calls coming from certain publishers (sources)
- Buyer: Calls coming from certain buyers (handlers)
You may also create a custom tag here for your own routing and reporting purposes.
To read more about all the different ways you can attach tags to a call, click here.
Setting up a Number Pool
Number pools can help save you money by recycling numbers and reusing them for multiple publishers, enable parameter mapping for concurrent page visits and support real-time page tracking.
Our guide to number pools can be found here.
Congratulations! Your call campaign is now ready to track calls!
To test and ensure routing is successful, follow our guide on how to test a call tracking campaign, or simply call the numbers you’ve added to the campaign and analyze your call log using a temporary test buyer to ensure calls are being processed correctly.
Next Steps:
- DNI: How to display dynamic tracking numbers on your landing page.
- Routing Settings: How to configure call routing paths for campaigns.
- Interactive Voice Response: How to communicate with callers using IVR prompts.
- Prompting Callers: How to prompt callers for additional information.
- Adding Data to Calls: How to add data to calls using Retreaver’s tagging system.
- Parameter Mapping: How to pull attributes from a visitors URL bar.
- Real-Time Page Tracking: How to track forms and events on your webpage.
- Click-to-Call: How to initialize calls programmatically from your webpage.
- Campaign Webhooks: How to trigger outbound webhooks during a call.
- Publisher webhooks: How to update caller attributes prior to a call.
- Endpoint Webhooks: How to update caller attributes at the end of a call.
- Collaboration: How to collaborate with Publishers and Call Buyers.
- Integrating With Retreaver: How to connect with third-party platforms.
- Analyzing Calls: How to view your Retreaver call log.
Help us improve this article or request new support guides.