Webhooks
Retreaver webhooks are used to send and receive call data through HTTP requests to external systems. The simplest and most effective way to forward call data out to a third party platform is through using Retreaver webhooks. Webhooks can be configured to automatically trigger at the start, during, or end of a call, sending call attributes to any HTTP endpoint capable of receiving and processing URL parameters.
Tip
The standard Webhooks in retreaver work with URL parameters. If you need to send more advanced JSON bodies or ping-post, see our Webhook Configurator tool available within each Webhook form.
For example: Webhooks can be used to request a response from a CRM or call center management system which can retrieve tags and apply them to return callers, send call data out to third party systems, or interact with data appending services which can trigger various actions.
Types of Webhooks
There are two main types of webhooks inside Retreaver:
-
Publisher Postback — Used by publishers who wish to send data into Retreaver before a call is processed inside a campaign. These webhooks typically contain data that will influence call routing decisions (caller interest and profile data) and can also pass along critical data for campaign-triggered webhooks (lead identification and verification).
-
Campaign Triggered Webhooks — Created inside a Retreaver campaign to forward any data associated with a call into another platform using HTTP requests. These requests deliver packaged information to various endpoints which can trigger actions using APIs, scripts, or online utilities.
-
Buyer Webhooks — Calls routed through a Campaign can trigger webhooks within the buyers assigned to the Campaign. This is particularly useful to do pings in RTB containing a bid.
-
Number Webhooks - You can unlock Webhooks (pressing the lock icon), this essentially clones and overrides the Campaign webhooks into your Number allowing you to make Number-specific changes, this is useful for example when running TV ads with specific numbers.
Adding Webhooks to a Campaign
- Edit a Campaign.
- Scroll to the Webhooks section and click the green Add button.
- Select a webhook trigger from the drop-down menu.
- Place tag values under matches if you wish to only trigger this webhook under certain circumstances.
- Enter the webhook URL
- Inside the Webhook URL use replacement Tokens to automatically substitute tag values or Retreaver data (Buyer ID, Publisher ID, etc) in the webhook URL. Tokens auto-populates right before the webhook runs using data from the Call.
- Click Update Campaign to save.
 Example webhook sending call data into Zapier to trigger a new Google spreadsheet row.
Webhook Triggers
Webhooks can be triggered at various times during a call. There are varying types of triggers available, each executing at a different point in the call but functionally equal in every other regard.
Start Ping Webhooks
Pings are used to retrieve data about a call from third party systems at the beginning of a call — this data is applied to the call as tags. Pings can also be used to inform third party systems about calls without retrieving additional data.
-
Start — Triggered as soon as the call is received. Native integrations with call start actions are run simultaneously. This ping is typically used to send caller data to a third-party service that will return additional data about the caller.
-
Selected — Triggered as soon as a Call Endpoint (Buyer) is selected during the routing decision. This ping is typically used to send data about the caller to the agent interface/CRM of the person who will be taking the call.
Warning: The selected ping may be triggered more than once if you're routing to multiple buyers and the first buyer doesn't answer the call. This may cause data leakage — buyers will be getting data about a call without accepting it. Use an "answered" ping instead if this is a concern. Selected pings should only be used when you need to ensure that the buyer's system has been updated before receiving the call.
-
Answered — Triggered as soon as the call is answered by the Call Endpoint (Buyer). This ping is typically used to inform an external system that the call was connected and whom it was connected to.
Browser Emulated Webhooks
Browser Emulated webhooks can be triggered at various points during a call cycle. They are regularly used to send conversion information to a third party platform or to send call data to a CRM at the end of a call.
- Connect — Triggered at the end of a call if a call successfully connected to a buyer.
- Conversion — Triggered when a call fulfills a campaign conversion criteria.
- Non-Conversion — Triggered when a call did not fulfill a campaign conversion criteria.
- Timer — Triggered upon the call reaching the timer specified under the webhook. Used to indicate if a call passed a certain time threshold.
- Postback — Triggered when a postback is received, typically used to wait for a postback which could potentially update call attributes.
- Always — Triggered at the end of every call and after any other applicable webhooks, typically used to send final call data into a CRM system.
Pass-through pings
- Pass-through Ping - Runs at the start of the call, along with the already available start pings. Useful for RTB when an affiliate system pings their campaign in order to gauge what their profit would be if they were to send a call to them.
Data-appending pings
- Data-appending Ping - Allows you to append data to the call before firing the passthrough pings. This ping allows you to tag the call, before sending the rest of the pings, which allows them to use the tags returned by your 'data appending' webhooks.
Receiving Data in Response to a Webhook
Method 1: Synchronously in the response body
Retreaver automatically parses the response body when executing a ping. If the URL you're pinging returns valid JSON, the keys and values of the root JSON object are applied to your call as tags.
Example start ping response:
{"first_name": "Jason", "last_name": "Kay", "geo": "us-10101", "age": 23, "gender": "m"}In this case, the response is parsed successfully and the call is tagged first_name:Jason, last_name:Kay, geo:us-10101, geo:us-ny, geo:us, age:23, gender:m.
Note: The "geo" tag is automatically inferred from the caller's area code. Returning a geo zip code formatted as shown above will cause the caller's location to be overridden. In this case, a geo state tag for New York and a geo country tag for USA are added. This is useful for properly routing callers whose area code doesn't match their physical location.
You can also return multiple values for a tag by setting the value to an array:
{"product_interest": ["mortgage", "insurance"]}This results in the call being tagged product_interest:mortgage, product_interest:insurance.
Method 2: Asynchronously via postback
Webhooks have a timeout window of 5 seconds to return a response. Sometimes data is not immediately available, in which case you can use call handler postback or call source data writing functionality to send Retreaver additional data about the caller if your system requires time to process the request.
Setting Up Conversion Webhooks
Publishers sending calls to a Retreaver campaign may ask affiliates to utilize a conversion webhook to pass along the payout value of a converted call to a third party system. This process requires a unique identifier to be passed to Retreaver, which is then associated with a specific call and used in the conversion webhook to link the resulting payout back to that call.
Step 1: Create a publisher data writing webhook
Create a publisher data writing webhook on a publisher profile. This webhook allows your publisher to pass their unique identifier to Retreaver. See the Call Data Writing guide for detailed instructions.
Step 2: Format the publisher data writing webhook
Once you've created the call data writing webhook, you will have a webhook similar to:
https://retreaverdata.com/data_writing?key=ac05a907-31c2-4057-a303-6872bb5d8ce6&caller_number=CALLER_NUMBER&key_1=value_1&key_2=value_2Format the webhook to store the unique identifier. For this example, we will use ringba_call_id:
https://retreaverdata.com/data_writing?key=ac05a907-31c2-4057-a303-6872bb5d8ce6&caller_number=CALLER_NUMBER&ringba_call_id=CALL_IDStep 3: Provide the webhook to your publisher
Provide the webhook to your publisher and instruct them to send a POST request. They will need to replace and provide the CALLER_NUMBER and the CALL_ID values.
You can view the postback log to test and verify successful delivery at: https://retreaver.com/postback_logs
Step 4: Set up the conversion webhook on the campaign
4A) Head to your Retreaver campaign edit page, scroll down to the webhooks section, add a new webhook, and set the trigger to Conversion.
4B) Paste the conversion webhook that your publisher provided and replace the substitute tag values for the unique identifier and the payout.
Using a Ringba conversion webhook example, the resulting webhook should look like:
https://webhook.ringba.com/hook/abcdefg123456?call_id=[ringba_call_id]&call_revenue=[payout]4C) Tag the webhook with a publisher/source ID using the tag wizard. This ensures the webhook only triggers for calls sent from that particular publisher.
Update your campaign to complete the conversion webhook implementation.
Conversion dataflow summary
- Before your publisher routes the call to Retreaver, they post the unique identifier for the call.
- Once they route the call to Retreaver, the call is processed into the campaign.
- When the call converts, Retreaver triggers the conversion webhook using the unique identifier and the payout that the call converted.
Sending Data When an Agent is Selected
The Selected Ping triggers a POST or GET to a third-party service as soon as a Call Endpoint (Buyer) is selected during the routing decision. The Selected Ping fires the pixel before an agent is connected. If your agent does not take the call and a new agent is selected after a timeout, the Selected Ping fires again for the newly selected agent.
Creating the outbound webhook
-
Edit the desired Campaign. Scroll to the webhooks section and click the green
 button to add a new Webhook.
 -
From the left drop-down menu, choose the trigger titled Selected.
-
Give the Webhook a descriptive name (e.g. "Send caller data to the selected agent") which will help you identify it in your Postback Logs and reporting.
-
Select either POST or GET as the webhook method and add the URL destination. Use Replacement Tokens to populate the URL with data from the call by substituting
[tag_key]tokens. Use the Token wizard to access all available tags.Frequently used tokens with the Selected Ping:
[handler_id]— The ID of the handler/agent answering the call. Use to identify the answering agent in your third-party system.[caller_id]— The Caller ID of the caller.[call_uuid]— The unique identifier for the call. Send if you plan to post data back to the call.[call_key]— The secret key for the call. Send if you plan to post data back to the call.
-
Save the Campaign changes.
Testing the outbound webhook
Retreaver provides the ability to test webhooks prior to sending live calls. On the Campaign's summary page, scroll to the Webhooks section:
- Click the Test fire button to open the Test fire Webhooks wizard.
- Populate each field:
- Target/Agent: Select one of the targets listed in the drop-down menu.
- Affiliate: You can ignore unless you intend on passing a
source_idas a URL parameter. - Tag List: Include any custom tags you have included in the URL parameters using a
key:valueformat (or leave blank).
- Click Fire. This generates a sample Selected Ping. Ensure your destination service received the request and review the logs. A "200 OK" message signifies a successful webhook event.
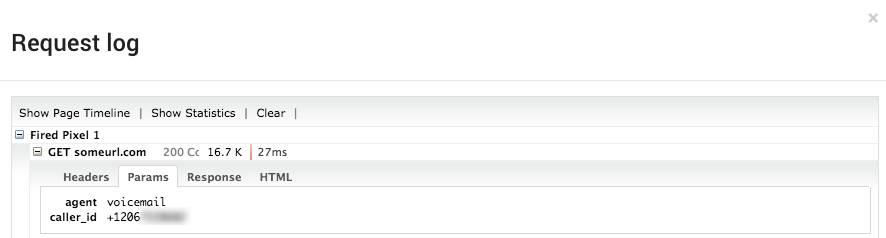 A sample request log from Test fire of the Webhook.
Configuring "Default Webhooks" at the Company level
Each Campaign in Retreaver allows you to set unique webhooks. When you use an external system to track leads or capture analytics, it's often the same webhooks being repeated for multiple campaigns.
Retreaver allows you to configure Default Webhooks for your company that are applied to each newly created Campaign:
- Go to Settings and then Company in the left menu, then click the Edit link.
- If you use Cake, HasOffers, or Voluum, simply enter your tracking domain and click the corresponding button. Your tracking links will be automatically configured.
Note: Customize your default webhooks with Tokens that are replaced with data about the call.
Webhook Configurator
The Webhook Configurator allows users to build, analyze, tweak, and troubleshoot call tracking webhooks using structured HTTP templates. Instead of constructing complex webhook integrations from scratch, you can select from a library of pre-built templates for popular platforms and let Retreaver automatically generate the integration and tag your buyer profiles. For a full guide on using the Webhook Configurator, including available templates and configuration properties, see the Webhook Configurator guide.
Test Fire Webhooks
You can test fire webhooks after they have been created, see our guide on Test Fire Webhooks for more details.
Viewing Fired Webhooks for a Call
From the Call Log
- In your Call Log, find the call you want to investigate and scroll to the right to reveal the Pixels column.
You may also view pixels fired on the call overview screen by clicking on the UUID of a call and clicking "Fired Pixels".
- Once you have clicked the UUID, you will see Fired Pixels listed on the page.
- The number of fired pixels is clickable. Opening it reveals a more granular view of what took place.
You can also access fired webhooks from the call overview page. Scroll to the Fired Pixels column and click the numerical property to navigate to the webhook overview page.
Troubleshooting Webhooks
Troubleshooting Campaign or Buyer Webhooks
Campaign webhooks can be viewed from the Call Log. They are listed under the Pixels Fired column on the right side of a call log record. Clicking on a record takes you to the webhook overview page.
Call Log: "Pixels Fired"
Call Log (beta): "Pixels"
Troubleshooting Publisher Postback Webhooks
Head into Settings > Company Settings > Postback Logs to view your postback logs using the Retreaver navigation sidebar.
This displays a list of postbacks your company has received. Clicking on a postback ID brings you to the postback properties page:
Viewing your postback log can help you determine if postbacks are being received successfully. You can view the delivered payload in JSON format and see what information your publishers are sending.
Retreaver automatically parses the JSON payload into tags using key:value format. Use this information to debug any issues with incoming postbacks. Common issues to look for are missing/empty fields or misconfigured key:value pairs.
Conversions not showing in your external system
If you see pixels firing in your call log but can't see them in your external tracking system, you'll need to contact your provider's support.
Retreaver records all traffic between our bots and the servers that process your pixels. You can download a HAR file log of this traffic and send it to your provider so they can figure out exactly what happened.
At the bottom of the Fired Pixels page there will be a HAR Log section. This HAR log file can be downloaded and opened using this online tool: HAR Viewer
Common Issues with Webhooks
| Issue | Solution |
|---|---|
| Webhooks are not firing | Make sure your webhook can execute successfully by reviewing the webhook trigger. Webhooks may trigger at the beginning of a call, at the end of a call, or under specific conversion/timer circumstances. If you have applied tags to a webhook under the "matches" field, those tags must be present on a call in order to trigger the webhook. |
| Inbound webhook responses are missing tags | When using webhooks to ping a system for additional information, review the response body of those requests. Your webhook could be misconfigured to send incorrect or missing information. Review your third-party API documentation or custom scripts to ensure valid JSON responses are being returned to Retreaver. |
| Outbound webhooks are missing tags | Retreaver uses replacement tokens to package tags into webhooks. Review the third party documentation and ensure your replacement tokens contain valid values. Use replacement tokens to supply tag values: https://hooks.zapier.com/?TagName=[TagValue]&TagName2=[TagValue2]. The "TagName" portion is the parameter the API expects. The [TagValue] portion is substituted with the tag value from a Retreaver tag key. For example: https://hooks.zapier.com/?Caller=[caller_number]&Zip=[caller_zip] |
| Error response from APIs | Review your third party API documentation and webhook logs to ensure you are sending valid parameters. Required parameters are often missing or outside an accepted range — this commonly occurs with invalid/unsupported zip codes or missing caller information. |
| Webhook delays are affecting results | Retreaver webhooks are typically fired, processed, and returned in under a second. Delays outside that range are caused by external infrastructure. During busy seasons, systems can be overloaded leading to slower response times. If you are attempting to request a response from an API before a call is routed, we recommend using a ringing audio inside a "Greeting" or "Please Hold" prompt to buy time while webhooks finish processing. A 5 second prompt will help ensure your webhooks are processed in time prior to connecting the caller. |
Help us improve this article or request new support guides.